WooCommerce, a powerful ecommerce plugin for WordPress, can be a good foundation for an online store. What’s more, when you run that site on Amazon Web Services, you can have a cost effective host.
Although there are several steps involved in creating an Amazon Elastic Compute Cloud (EC2) instance, setting up the web server, and installing WordPress and WooCommerce, the task is something that can be done with only a little technical experience.
What follows are the basic steps to get WooCommerce up and running on EC2.
Step 1: Log into the AWS Console
To use Amazon Web Services, you will need Amazon credentials. Interestingly, these can be the very same user name and password you use to shop on Amazon. To access the AWS console, simply visit aws.amazon.com, click on the “Sign In to the Console” button, and enter your credentials. Once you have reached the console, click the link for EC2 — at the time of writing, this link was in the upper left under the subhead “Compute.”

You may use the same Amazon username and password for AWS that you use to shop on Amazon.
Step 2: Create and Configure a New EC2 Instance
Once you’ve selected the EC2 link, you should find yourself viewing the EC2 dashboard. In the center of the page, there’s a blue “Launch” button used for creating a new EC2 instance. You can think of an EC2 instance as a virtual server on which you’ll run your WooCommerce store.

Look for the blue “Launch” button.
Amazon has a number of quick-start EC2 options. For our purposes, use Ubuntu Server 14.04 LTS. You may have to scroll down to see the Ubuntu option.

You may need to scroll down to find the Ubuntu option.
Next, Amazon will ask you to choose an instance type. This describes how your server will be equipped, including its memory and computing capabilities. Amazon offers a description of these instance types in the EC2 documentation. For the purposes of this article, I am selecting a t2.micro instance, which is eligible for a free tier on AWS.
AWS allows for further instance configuration, but in our case, just click the blue “Review and Launch” button.
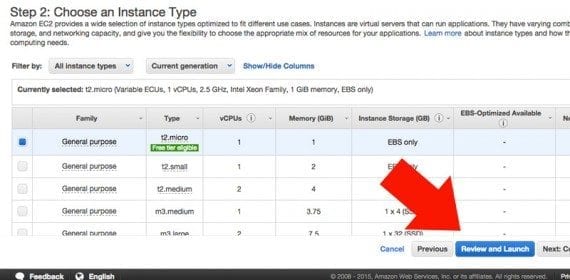
For the fastest start, you can simply review and launch the EC2 instance.
Amazon will display a launch page; ensure that SSH is enabled under the security groups section and click “Launch.”
You will be asked to create a key pair. This is important since you will need this pair key to access the EC2 instance via SSH. Download the new key pair and launch the instance.
Amazon will load a page telling you that it is launching the new instance. At the lower right of this page, you will find a link to view instances.
When the instance is launched, it will not have a name. Hover over the name field and you should see a pencil icon. Clicking the icon, will allow you to name the instance.
Step 3: SSH to Your EC2 Instance
Secure shell — “SSH” — is an encrypted network protocol. It will allow you to securely connect to your EC2 server. If you are using an Apple computer or a computer running a Linux operating system like Ubuntu, connecting is fairly easy. Connecting from a Windows device takes a few extra steps.
From an Apple or Linux machine, open a terminal window.
From the terminal window, you will need to navigate to the key you downloaded in the last step. On a Mac, this will probably be in the Downloads directory, so from your terminal you would change directories by typing the following into the command line.
cd Downloads
The key file, which will have a .pem extension, requires some particular permissions, so once you have located it, you will need to change the file permissions with the following code. In the example below, “wooDev.pem” is the name of the file downloaded from Amazon, when the EC2 instance was created. For clarity, this is a command that you run in the terminal.
chmod 400 wooDev.pem
With the file permission updated, you are ready to connect to the EC2 instance. Take a look at the complete command required, and then we will look at it piece by piece.
ssh -i wooDev.pem ubuntu@ec2-54-213-51-204.us-west-2.compute.amazonaws.com
The first part of the command is “ssh.” It tells the computer that you want to make an SSH connection. The “-i” tells your computer that you will be using a key. The path to the key is what you type next. If the command is being executed from within the same folder as the key, you can just put the name of the key file, as seen in the example.
ssh -i wooDev.pem
If you were running this command from your root directory, you might include the downloads directory in the file path.
ssh -i Downloads/wooDev.pem
Next, you need to provide the user name you will use to connect to your EC2 server. For the Ubuntu 14.04 server you created, that user name is simply “ubuntu.” The @ symbol separates the user name from the public DNS for the EC2 instance. So, if you were building the command as you read, you would have the following.
ssh -i wooDev.pem ubuntu@
The last bit is the public DNS for the EC2 instance. Look on the EC2 view instances page you had open from Step 2, above. Click the box to the left of your instance name, and information about the instance will appear in the lower section of the page. You will see the public DNS listed there. Add that public DNS after the @ and you have the completed command.

The public DNS is the web address for your EC2 instance.
ssh -i wooDev.pem ubuntu@ec2-54-213-51-204.us-west-2.compute.amazonaws.com
Press enter or return on your computer, and your system will connect to your remote EC2 server. You may need to tell your computer that it is safe to trust your EC2 instance the first time that you connect.
Once you have connected, your terminal represents that EC2 server, not your local computer. Try pressing ~ followed by . to exit the session on a Mac.
On Windows, you will need an extra bit of software, like PuTTY, in order to access your EC2 instance. PuTTY does not support the .pem key file that you downloaded from Amazon, but it has a tool called PuTTYgen that will convert the key for you. Amazon has a document explaining how to do the conversion. Once you have PuTTY up and running with the converted key, you can connect to the EC2 instance.
Step 4: Install the LAMP Stack
WordPress, and in turn WooCommerce, requires a LAMP stack. This stands for Linux, Apache2, MySQL, and PHP. Using your terminal and SSH connection, you need only to type a few commands that will use a feature called the Advanced Packaging Tool (APT) to install the LAMP stack.
The first command ensures that APT is up to date.
sudo apt-get update
This should take a few seconds to run. The last line of the update will read, “Reading package lists… Done.”
Next run the command to install the stack. Note that there is a caret (^) at the end of the line.
sudo apt-get install lamp-server^
As the installation runs, you will be asked to allot additional disk space. Type “Y” to confirm.
You will then be asked to create a password for the root MySQL database user. This password should be very secure. You will also be asked to confirm this password a second time.

You will need to create a password for the root MySQL database user.
Unless you see an error message, you will have a functional LAMP stack once the process is finished.
You will need to open port 80 on the EC2 instance to confirm if your web server is working. To do this, return to the EC2 instances page. If it is not already checked, click the box to the left of the name of your instance. Details about the instance will appear in the lower portion of the screen. Look for the security groups and click the name of the current group. It may be something like “launch-group.”
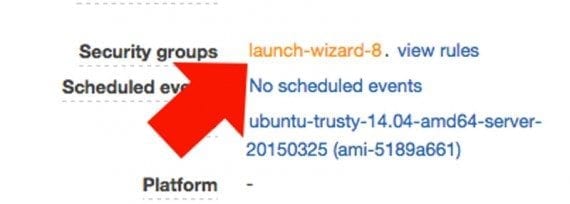
Locate the security group link on the lower portion of the EC2 instances page.
When the security group page loads, click on the “Inbound” tab and then click “Edit.”
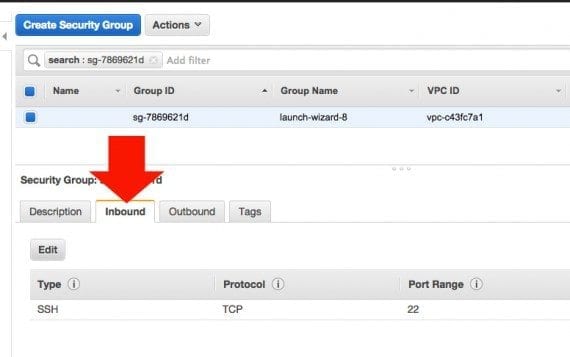
You will want to edit your inbound connections.
From the edit dialog, click add “Add Rule” and use the drop down menu to choose “HTTP.” Repeat this step, adding “HTTPS” too.
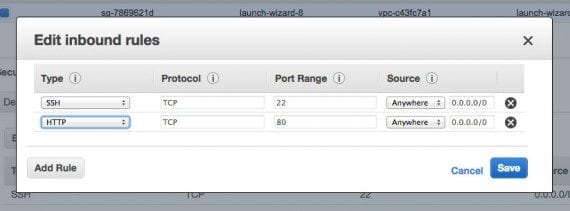
You will need to add a rule for HTTP and HTTPS.
Using the navigation on the left side of the screen, click “Instances” to again see a list of your instances and find the public DNS for your EC2 instance. Copy the public DNS and paste it into a browser’s address bar. When you open the page, you should see the Apache2 default page.
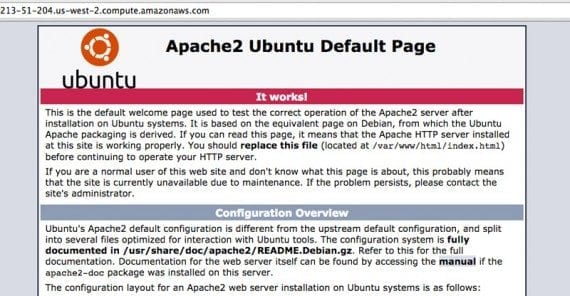
That Apache2 default page is your best indication that your web server is up and running.
Step 5: Prepare the WordPress Database
You could use your root MySQL user for your WordPress-powered WooCommerce store. But most people will create a specific WordPress user for the WordPress database. To do this, return to your terminal and type this command.
mysql -u root -p
The server will ask you for your MySQL password for the root user. You created this password in Step 4, above.
The command prompt should now say “mysql”.
You will, next, create a new database using the command shown below. In this example, the database will be called wp_woo, but you can name it anything you want.
CREATE DATABASE wp_woo;
You should get a message telling you that your query was “OK.”
Next, you will create a new user for your new database. In the example, the user is wp_woo_usr.
CREATE USER wp_woo_usr@localhost IDENTIFIED BY ‘password_goes_here’;
Your new user will need permission to make changes to the wp_woo database. The following line of code, executed in the terminal, will grant that permission. Notice that we use the name of the database, wp_woo, followed by a star (*), to indicate that the user may change any table in the database. This is important since WordPress will create several tables.
GRANT ALL PRIVILEGES ON wp_woo.* TO wp_woo_usr@localhost;
To complete the database preparation, you should run the FLUSH PRIVILEGES command to make certain that MySQL recognizes the changes you have just made.
FLUSH PRIVILEGES;
The exit command will take you out of MySQL and return you to your EC2 server’s regular command line. MySQL will even say “bye.”
exit;
Step 6: Install WordPress
From the command line you will want to change directories. Use the command below to put you in the proper place, if you will.
cd /var/www/
From here, we will temporarily change the permissions for the Apache document root directory to allow for adding the WordPress files. Change this back to something like 644 later.
sudo chmod 777 html
Next, we will change to the html directory.
cd html
Inside of the html directory, we will add the WordPress files. Here is the command to use to get the most current version of WordPress.
wget http://wordpress.org/latest.tar.gz
If you type “ls” you will see a list of files currently in the html directory on your EC2 server. This will include a file named latest.tar.gz and the index.html file that is the default for Apache2.
The next command that you run will extract the WordPress files and load them into a new directory called wordpress.
tar xzvf latest.tar.gz
You will probably want your WordPress instance at the root level, so you’re going to move all of those files up one level, if you will, with the command below.
mv wordpress/* .
It can also be a good idea to rename the Apache index.html file.
mv index.html apache-index.html
Next, change the ownership of the WordPress files and folders to the web server.
sudo chown -R www-data:www-data ../html/
Step 7: Basic WordPress Configuration
All of the WordPress files are in place; you simply need to configure the site. The files installed on the server include a wp-config-sample.php file. Copy that file in the terminal, renaming it wp-config.php with the command below.
cp wp-config-sample.php wp-config.php
Next, open the configuration file in a text editor, using the command you see below.
sudo nano wp-config.php
When the file opens, you will not be able to move around with your mouse — you may have already noticed that the mouse does not work in the terminal — so you will need to move around with your arrow keys.
In the file, there is a section for the database name, database user, and database password created in Step 5, above. Type these into the file and then press the control key and the X key on your computer. You will be asked to confirm twice.

WordPress makes it easy to find the sections in the wp-config.php file that you will need to update.
At this point, open the EC2 instance’s public DNS in a browser window. You should now see the WordPress installation wizard.
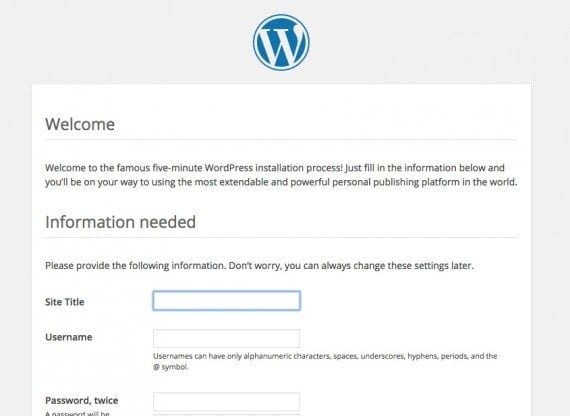
WordPress has a short installation wizard that you will need to complete. It will be just one page.
Complete the wizard. The password requested will be the password that you use to access WordPress and, ultimately, your WooCommerce store.
Press the “Install WordPress” button at the bottom of the page. And WordPress should now be installed. Use the “Log In” button to access the administration panel for your WordPress site.

The WordPress installation is complete when you see the success message.
Step 8: Install WooCommerce
Add WooCommerce to your WordPress installation and you will have the foundation for your ecommerce site.
From the WordPress administration dashboard, which you logged into at the end of Step 7, above, navigate to “Plugins” and “Add New.”
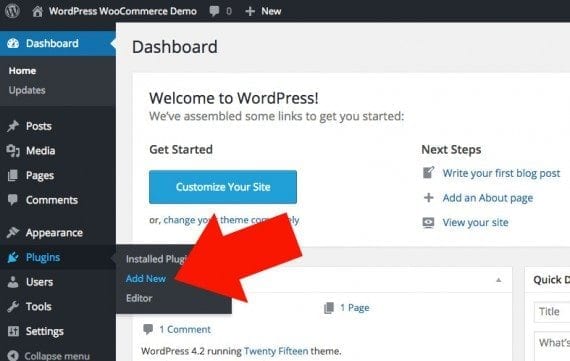
Look for the Plugins, Add New link.
When the Add Plugins page loads, use the search field at the left of the page to search for “woocommerce.” When the search results load, locate WooCommerce by WooThemes and click the “Install Now” button. Finally, click to activate the plugin.

Since you changed ownership of the WordPress folders, you do not need FTP credentials to install WooCommerce.
With that, you now have a WordPress-powered, WooCommerce store running on Amazon Web Services. There is still a fair bit of set up work, but the foundation is in place.


