One Facebook advertising option you don’t hear much about is Custom Audiences. It helps companies reach current customers and prospects. Only large advertisers could previously participate in Custom Audiences, but now businesses of any size can use it.
There are at least two benefits to using Custom Audiences.
- It helps strengthen the relationship you have with your customers and prospects.
- It enables you to create targeted offers for this group.
You can create a Custom Audience using email addresses, phone numbers, Facebook user IDs, or mobile advertiser IDs.
In this article, I will explain how to create a Custom Audience from an existing mailing list. You can upload a list of email addresses through MailChimp or by using your own data files. The email addresses will be matched against people in Facebook to create a Custom Audience.
MailChimp users can select a specific mailing list or list segment to upload. If you’re uploading the addresses directly, create a CSV file in Excel. The document should have a single column of data with no heading. Facebook secures and encrypts the data, so that it remains confidential.
Facebook recommends that Custom Audiences have at least 1,000 people. Rarely, if ever, will there be 100 percent success in matching addresses. In some cases, people may use a different email address for Facebook, and not everyone will have a profile there.
There are three ways to create Custom Audiences: using the Ads Manager, Ads Create Tool, or Power Editor.
Creating a Custom Audience Using Ads Manager
- Go to your Ads Manager.
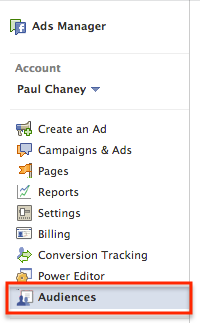
- Select “Audiences” from the left column and click “Create Audience.”

Create a Custom Audience using Ads Manager.
- Choose to upload your Custom Audience through MailChimp or a data file.
- Give the Custom Audience a relevant name and description. This will come in handy if you plan to run several campaigns with different audiences.
Creating Custom Audience Using Ads Create Tool
If this is your first time creating a Custom Audience, you’ll need to use the “ads create” tool.
- Go to the ads create tool and create your ad.
- Go to the “Create Your Audience” section and select “Create New Custom Audience.”

Create a new Custom Audience while setting up your ad.
- Choose to upload your Custom Audience through MailChimp or a data file.
- Follow the required steps to upload your Custom Audience.
Creating a Custom Audience Using Power Editor
- Go to Power Editor and click “Download to Power Editor” from the top of the page to download your latest data for the accounts you specify.

To create a Custom Audience, first download the latest data for your Page.
- Select Audiences from the left side navigation.
- Go to the Create Audience drop-down and select Custom Audience.
- Fill in the Audience Name, Description, upload the CSV file, select the type of information that you uploaded and select Create.
It may take up to 30 minutes for your Custom Audience to upload. You’ll be notified via email as soon as the upload has completed.
Creating Your Ad
Once the Custom Audience has been set up, follow these steps to create your ad.
- Choose Ad Objective.
- Decide on the results you want to achieve from your ads, as follows.
- Page Post Engagement
- Page Likes
- Website Clicks
- Website Conversions
- App Installs
- App Engagement
- Event Responses
- Offer Claim
- Choose Page. If you manage more than one Page, choose the one you wish to promote.
- Select Ad Creative.
- Images. Choose up to six different images to create more ads in the campaign. The recommended size is 600 pixels x 225 pixels. You can upload new images, browse your Facebook image library, or find stock images from iStock.

You can add up to six images for use with your ad campaign.
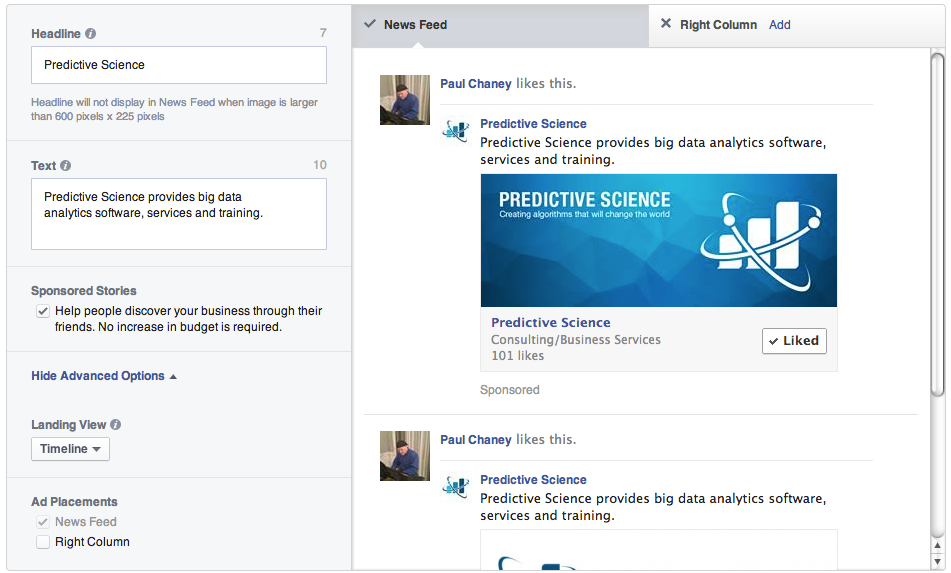
- Ad copy. Create your ad copy by adding a headline (Page name is the default) and body text. You can also see a preview how the ad will look when it is displayed. Advanced options include choice of landing page and ad placements: News Feed or right-hand column. Traditional right-column ads aren’t as effective as they once were, so be sure to choose News Feed. That option is more expensive, but the chances of people seeing and engaging with the ad are greater.

See a preview of how the ad will look when it is displayed.
- Choose Custom Audience. Choose the Custom Audience from the mailing list you uploaded.
- Select targeting options. Targeting options include location, age, gender, languages, interest categories, connections, and others.
- Set campaign name and budget. Set the campaign name, budget, schedule and ad optimization option, then review the ad or go ahead and place the order.


