Using advance segments in Google Analytics enables isolating and analyzing specific groups of traffic data. You can extrapolate and examine trends from these reports, allowing you to respond with critical business and marketing decisions.
For example, if your ecommerce business ships internationally, you may want drill down into behaviors and conversions of customers from a particular geographic region or country and further analyze their purchase patterns. Your findings as a result of segmenting traffic may reveal that there are problems with shipping, pricing (in relation to local competition), or content issues on product pages.
In this post, I will review the Google Analytics advanced segments feature.
1. Categorized by Users, Sessions, and Hits
The first thing to know is that there are three subsets of advanced segments: users, visits (sessions), and hits.
- User segments evaluate all data specific to users. This includes all site visit data that a user generates within the time frame currently in view.
For example, you may want to create a user segment to see all the users that have generated at least $200 in revenue. The metric in this condition, “revenue,” is applied to each user. So the segment will add revenue based on each individual user. It could be that some users have generated $200 over multiple sessions, while others have generated $200 over a single session.
- Visit (or session) segments evaluate all data specific to visits. It will provide data from all of the visits that meet your criteria.
Consider the same revenue example from a visit perspective. If we create a segment of $200 in revenue per visit, Google Analytics will group individual visits that match the criteria. So a single customer that has made a $200 purchase (or more) on three separate visits will be shown as three visits in that segment.
- “Hit” segments evaluate user interaction within a session.
If a hit-level condition — such as a page view or an event — is applied, then Google Analytics will return all data from the session. not just the hits that match the condition.
The hierarchy can be illustrated as follows.

There are three subsets of advanced segments: users, visits (sessions), and hits.
2. Using Segment Builder: Dimension Groups and Metrics
The segment builder tool is used to configure filters in specific advanced segments using dimensions and metrics.
You choose a dimension or metric, a comparative operator, and then enter a value to set the condition for the filter. In many cases, you can also choose the scope of the data — hit, session, user.

The left part of the navigation has a list of dimension groups.
In the above screenshot, the left part of the navigation has a list of dimension groups. Within each group, you’ll find the most common dimensions or metrics in that group.
- Demographics. Segments users by demographic data, such as age, gender, language, affinity, and location.
- Technology. Segments visits by operating system, browser, screen resolution, device, and mobile.
- Behavior. Segments users by how often they visit and conduct transactions (number of visits, days since last visit, and visit duration).
- Date of First Session. Segments users by the date and time they first visited.
- Traffic Sources. Segments users by referral, using campaign, medium, source, and keyword fields — such as the ones you would add as UTM parameter tags on your URLs.
- Enhanced Ecommerce. Segments users by revenue they’ve generated and by products they’ve purchased. This group appears only for views where enhanced ecommerce is enabled.
It is worth noting that each filter in a segment has one or more scopes to the data that it defines according to the type of segment (hit, session, or user). You can choose the scope for some filters; for other filters the scope is fixed.

Each filter in a segment has one or more scopes: user, session, or hit.
Let’s create a simple segment for users that have spent $200 or more over a specific period. First, specify that you want this applied to users. Then simply choose the right conditions and enter $200 into the revenue field.

When adding a condition, you get an indicator in the summary pane on the right — Revenue of $200 in this example.
Notice that when adding a condition, you get an indicator in the summary pane on the right. To add conditions to this segment, navigate to another dimension group and add the condition. Let’s try that.
Say you want to add a location condition to this segment. Clicking on the “Demographics” group creates a condition that includes users from the United States.
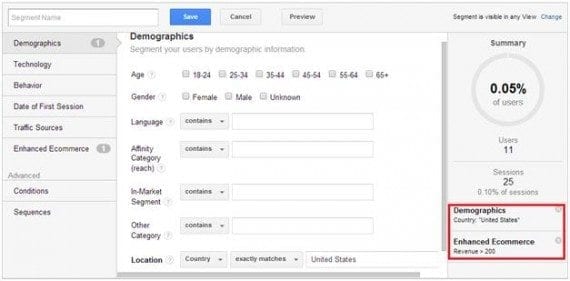
Clicking on the “Demographics” group, create a condition that includes users from the United States.
Now you have a segment of users, located in the U.S., that have spent $200 or more in your store. Notice that one more filters have been added to the summary pane on the right.
You can now apply this segment to any date range less than 90 days.
Using the Advanced section you can create segments that include multiple user conditions, multiple visit conditions, or a combination of the two. This allows you measure the impact of single session behavior on the long-term behavior of a user.
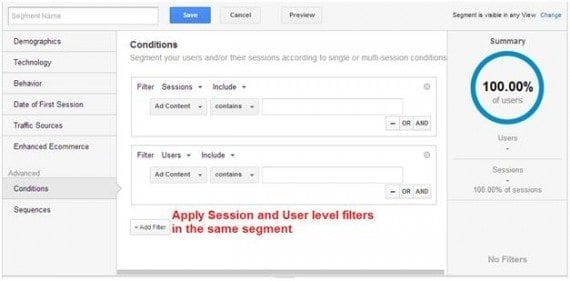
Using the Advanced section you can create segments that include multiple user conditions, multiple visit conditions, or a combination of the two.
For example, you might want to understand how reading your blog impacts the long-term value of a user. First, create a user filter based on the value of the user. Then add a session filter to match viewing blog content.
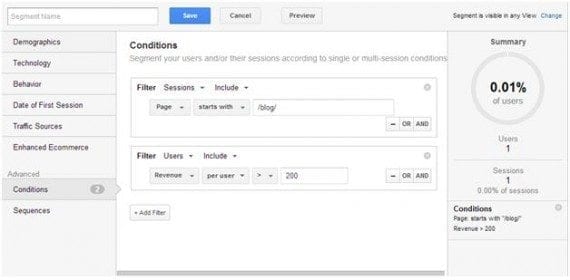
To understand how reading your blog impacts the long-term value of a user, create a user filter based on the value of the user. Then add a session filter to match viewing blog content.
The filters are applied in two stages. First, Google Analytics selects users based on the user filter (and includes all their visits). Then Google Analytics selects visits from the resulting set of data from the user condition. This advanced segment can help answer the question, “Does my blog help drive more sales?”
Another advanced feature in Google Analytics’ segmentation tool is the ability to create a sequence segment. A sequence can be between visits or it can be within a single visit. A sequence filter could be used to segment users that have viewed two-consecutive pages in a row, like two steps in the checkout process or a category-to-product page.
For example, you might want to see users that have started a checkout process but did not purchase. It uses a page condition (“Step 1” at the report snapshot below) to represent adding something to cart. Then we evaluate if transaction were equal to zero during the session (“Step 2”).
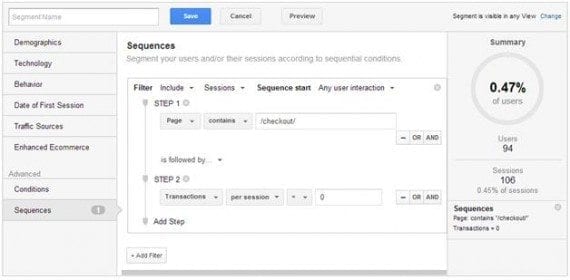
To see users that have started a checkout process but did not purchase, use a page condition (“Step 1”) to represent adding something to cart. Then evaluate if the transaction was equal to zero during the session (“Step 2”).
Sequence segments are useful when you need to see how two actions, either concurrent or separate, impact behavior.
You can also test or preview the segment before saving. This will allow you to spot errors and make corrections. If your segment returns no data, for example, this may indicate a problem.
You do not have to create your own custom segment. The built-in segments are useful. The default view will show you all of your advanced and custom segments. You can use the tabs to see only built-in segments, custom segments you created, or favorite segments you have starred. You also can search your advanced and custom segments. To edit a segment, click on the small gear icon that appears when you hover over the segment.
3. Creating Cohorts
A cohort is a group of users that share a common characteristic within a defined period of time. A cohort is essentially a segment that includes some type of date condition. For example, I might want to look at all visits that first visited my site in February, asking “What have visitors done since February?”
First, create a cohort based on a user’s first visit to the site. There’s a new dimension for this called “Date of First Visit.” Simply specify the date range, or a single date, for the first visit. The date range for the cohort cannot be more than 31 calendar days.

To look at all visits that first visited my site in February, for example, create a cohort based on a user’s first visit.
You can also use the date-of-first-visit dimension when creating other segments. For example, for an ecommerce site, you might want to combine first visit segments with total revenue for each user. So, you would combine the Date of First Visit condition with the “Enhanced Ecommerce” condition, as follows.
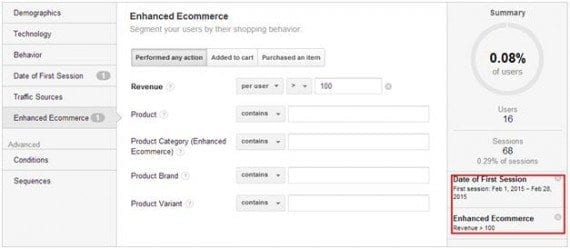
To combine first visit segments with total revenue for each user, combine the Date of First Visit condition with the “Enhanced Ecommerce” condition.
The resulting data would look something like this.
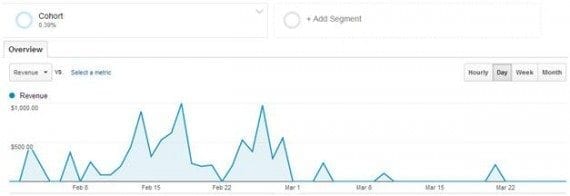
This example shows revenue from users with first visits to the site between February 1 to 28.
From the screenshot above, you can see all revenue data from users with first visits to the site between a specific timeframe: February 1 to 28. Notice that this group has not generated much revenue in the month of March.
You can compare the behavior of this cohort with, for example, the revenue generated by the group of users who first visited your website in January.
Bear in mind that, in cohort segments, user-based segments can only be applied over a 90-day period. Another limitation is that cohorts cannot yet be created around a conversion. There are no dimensions in Google Analytics that contain the date of conversion. There is only a dimension for the first visit date.
4. Segments Import
If you are not ready to make your own custom segments and would like more options than the 22 built-in advanced segments that Google Analytics offers, you can use the “Import from Gallery” button for more segments that have been created by the Google Analytics team and other Google Analytics users.
Google Analytics’ Solutions Gallery is a free marketplace where you can publish and download custom segments. When you import a segment from the Solutions Gallery, you import only the configuration for the segment. You do not import any data.

Google Analytics’ Solutions Gallery is a free marketplace where you can publish and download custom segments.
When you click the Import button on one of these segments, you will be taken to a screen to confirm that you want to import the segment to your Google Analytics profile.

Clicking the Import button leads to a screen to confirm that you want to import the segment to your Google Analytics profile.
Select the “Any view” option to make the segment available in all views in the current Analytics account. Select the second option for a specific view from the menu if you want to make the segment available in only one view.
Click “Create” and the segment builder opens with the configuration of the segment.
To view your imported segments, find them under the Custom segments view.
5. Segment Analysis Examples
Now I’ll walk you through some easy-to-create, yet useful, advanced segments.
- Mobile traffic (excluding tablets). Google Analytics provides a pre-loaded advanced segment for mobile traffic; but it includes tablet traffic. And because the context of mobile and tablet visitors to your store can be quite different, it would be prudent to view each device independently.
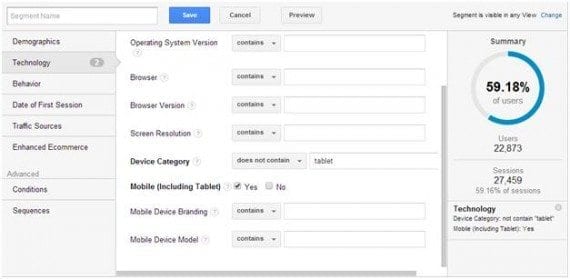
Google Analytics provides a pre-loaded advanced segment for mobile traffic; but it includes tablet traffic.
- Organic traffic with conversions. The following segment shows organic search traffic that has converted.
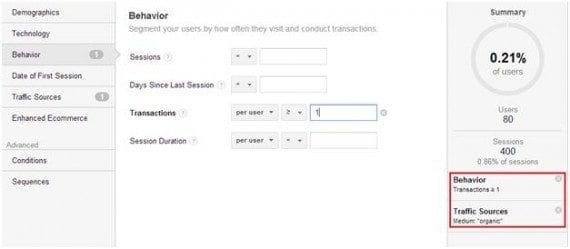
This segment shows organic search traffic that has converted.
You can create similar segments for other sources of traffic, such as social networks or website referrals.
- Blog traffic. To view the volume of traffic your blog is driving to the rest of your site, use this segment to view visitors that have started their sessions from a blog page.
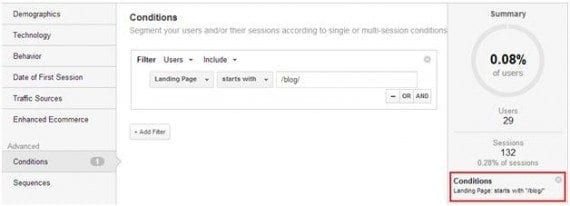
To view the volume of traffic from your blog, create a segment to view visitors that have started their sessions from a blog page.
- Page depth. The “Page depth” segment reveals users that have viewed three or more pages over their session on your site. It’s a good way of looking at the depth of engagement, and how effective you keep people on your site.
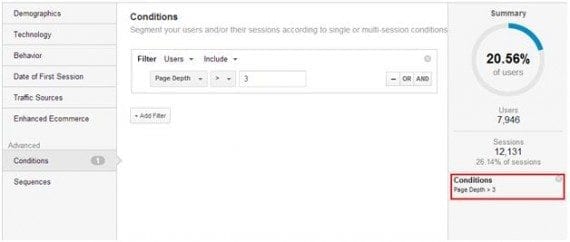
The “Page depth” segment reveals users that have viewed three or more pages over their session on your site.
For example, if you are experimenting with cross-sell or up-sell of related products from product pages, use this segment to compare time periods to view how effective your efforts are.
You can create similar segments for different sources of traffic — such as depth of visits for social network traffic, to find out which of the social networks send the most engaged traffic.
Conclusion
Advanced segments are good at determining acquisition channels that drive quality traffic to your site. You can also create segments for different demographic groups, to see what pages they visit most and how long they stay on your website. You can segment users and sessions with specific keywords you are targeting on AdWords. Different campaigns that you track with UTM parameters can also be segmented. Custom segments are available for importing and sharing with others.
In short, advanced segments is a powerful tool for investigating important sets of website traffic and for revealing weak areas in your site, to address.


