A key role of analytics is tracking and understanding how all the different channels — especially social channels — work together to drive sales on your ecommerce site. Any good social campaign (and any online activity you want to track outside of your site) depends on tracking and measuring.
I do this daily in my role as online marketing manager for a small, New York-based startup. Our budgeted is limited. I have to know how our various social and other campaigns perform, or not.
UTM tracking can accomplish this. UTM is “Urchin Tracking Monitor.” It gives you the power to identify traffic based on specific parameters, such as where it’s coming from, what ad it’s coming from, or if it’s a special campaign.
Why use UTM? There are many reasons.
- Accurately track specific promotions, and learn what works and what doesn’t.
- Determine how specific ad sizes perform in terms of site traffic.
- Understand which Twitter or Facebook copy is driving the most traffic and revenue.
- Understand the differences between what the ad dashboards report versus your own site analytics.
You may be wondering, “Why do I need to know clicks and conversions if the Facebook ad dashboard tells me this?” That’s a valid question. But with the data provided to you in Facebook’s ad dashboard, you’re only scratching the surface. You won’t see how that traffic actually interacts on your site. And if you’re concerned about other metrics (as you should) — such as time on site, number of pages viewed, and bounce rate — you won’t be able to find them.
I could write about the benefits of using UTM on everything that’s external to your site. But that would take much time and space. For this post, I’ll explain what makes up a UTM link, how you create one, how you use one, and how you see the metrics in Google Analytics.
If you’ve spent time in analytics, a lot of this will make sense. But if not, that’s okay. Understanding what makes up a UTM link will speed up your understanding of Google Analytics.
What Makes Up a UTM Link?
Let’s consider a scenario where I have a Facebook ads campaign with multiple posts and multiple images. I want to understand how each text and image combination work together.
Here’s my link for one of the ads.
https://www.test.com/?utm_source=facebook.com&utm_medium=cpc&utm_term=Image%201&utm_content=Text%201&utm_campaign=Summer%20Promotion
Now let’s break this link down, to understand what each metric means, and what it corresponds to in Google Analytics.
- First, there is the “utm_source” value, which translates to the “source” dimension in Google Analytics. This is where traffic is coming from. You can name it whatever you want. In this example, my source is “facebook.com.” The reason for this is if I wanted to see all traffic, both referral and paid, I could easily set up an advanced segment (more on that later) for source = “facebook.com.”
- Equally as important is the medium, specifically “utm_medium,” which tells me what type of traffic this is. Since this is a Facebook ads campaign, this traffic is CPC – cost per click. Again, I can group this in Google Analytics with all my paid traffic by segmenting “medium = CPC.”
- The next two metrics — “utm_term” and “utm_content” — are both optional and interchangeable. It’s about personal preference and how granular you want to get with your analysis. I use both, as I often pair multiple ad images with different ad texts. It is the only way to keep track of all the combinations.
- Easily the most important part of the link — “utm_campaign” — is the name of what you’re tracking, for example “Summer Promotion.” Think of this as another way to roll up all the different ads and sources to see higher-level insights.
It’s important to note that the “source,” “medium,” and “campaign” fields are required for valid UTM link. But “term” and “content” fields are optional. Though, again, I recommend using them to obtain granular data. If you need to enter a space between words, use “%20” on the URL.
How to Make Your Own UTM Link
There are two ways to make UTM links in Google Analytics. The first is for one-off links and small campaigns, using the Google URL builder.
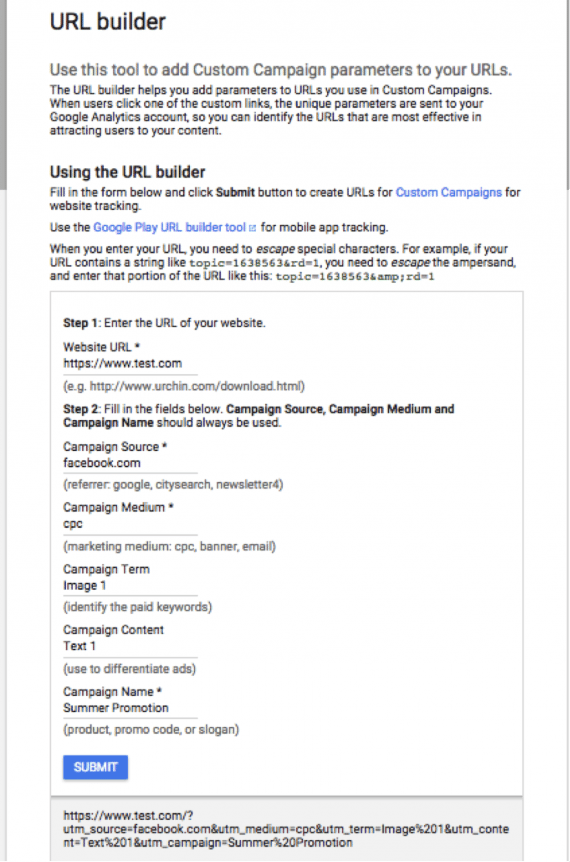
The Google URL builder is for one-off links and small campaigns.
The second applies to large-scale operations, using the Google Analytics campaign tagging tool, by Cardinal Path.

The Cardinal Path campaign tagging tool in Google Analytics applies to large-scale operations.
Both tools are straightforward. Just fill in the variables with the specific information and the links get generated
Keep in mind that UTM codes are public. So, for example, if you’re targeting a segment of people over 50, and you call that segment “Old People,” don’t call the campaign “Old People Targeting.” The UTM codes sit in the URL — anyone can see them. Always be cognizant of this and use codes (not actual descriptions) if you’re targeting specific demographics. For example, “Old People” could be “OP.”
Implementing Your UTM Link
Implementing your link is as simple as using it for the first time in the ad platforms. Just use the full UTM link as the website source when you’re creating your campaign.
Keep these two tips in mind, however.
First, in Facebook, just add the domain and then add the UTM codes after you create your ads. But there’s a catch. This can only be done in Power Editor. To do this, open Power Editor, select the ad, and then scroll down to the “Tracking Section,” where you’ll see the empty box beneath “URL Tags.” Paste the UTM code there.
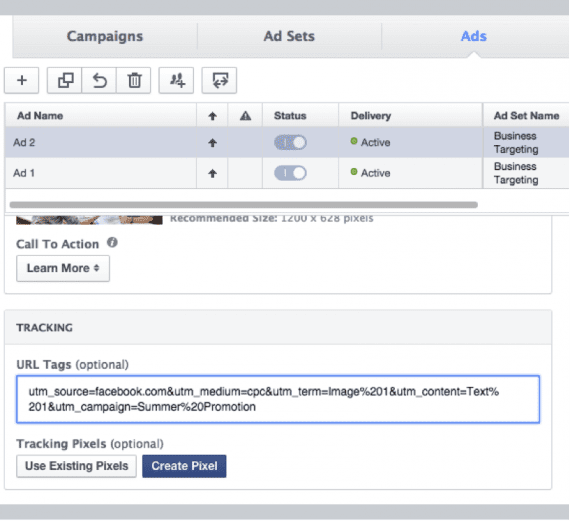
In Facebook, add the domain and then add the UTM codes after you create your ads.
Second, with Twitter, I always use a link shortener, such as bit.ly or a goo.gl, so that my links look cleaner, and I can see the number of clicks on the link. providing three layers of tracking. Just one thing with the link shorteners: You can shorten links without being signed in; make sure you are signed in so you can view the data easily and in one place.
Seeing Your Data in Google Analytics
Here’s the fun part: viewing the data in Google Analytics. Log in to Google Analytics, select your site, and simply click on the “Acquisition” tab.
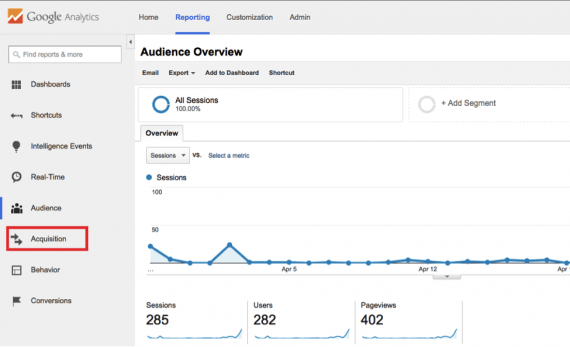
To view the data in Google Analytics, simply click on the “Acquisition” tab.
From there, the tab will expand, revealing “All Campaigns” at the top. Click that. If everything is set up correctly, you should see your data.
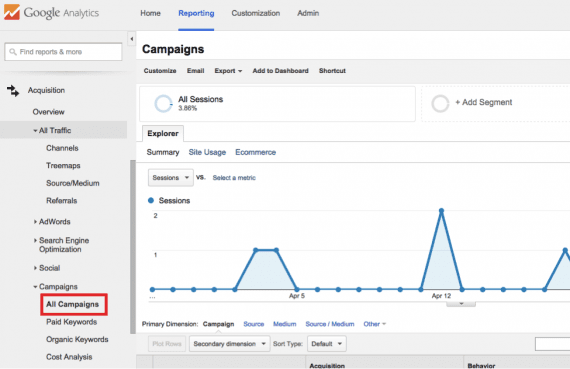
The “Acquisitions” tab will expand, revealing “All Campaigns” at the top. Click that. You should see your data.
You’re able to see how that traffic interacts with everything on your site by creating an advanced segment. This is how I view my campaign data. There is so much potential here. Here’s how to set it up.
From any view in Google Analytics, click on “+Add Segment.”
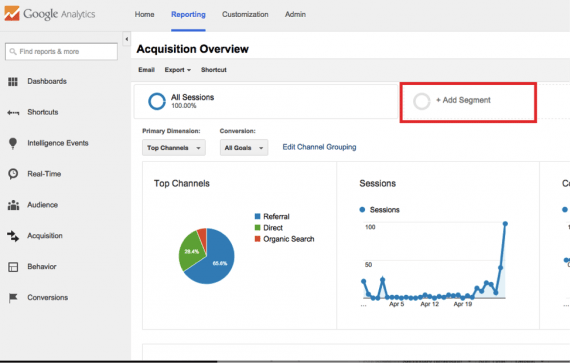
See how traffic interacts with your site by creating an advanced segment.
Next, click on “+New Segment.”
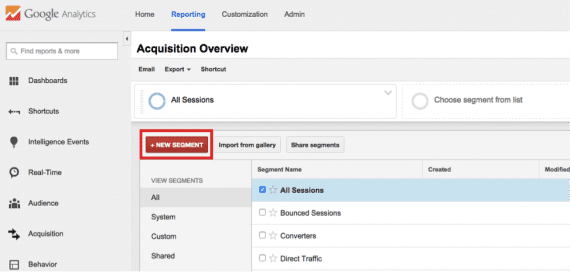
Clicking “+New Segment.”
Enter all the information from the UTM link you created. If you’ve received visits from your link, this data will auto-populate. You can be as broad or as specific as you’d like. For example, you could just enter the “source/medium” and “campaign,” allowing you to see all the ads as one per source. Conversely, you could just add the campaign name, letting you see performance by all mediums.
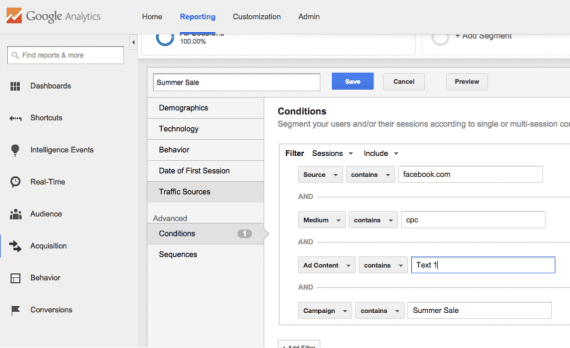
Enter all the information from the UTM link you created. If you’ve received visits from your link, this data will auto-populate. You can be as broad or as specific as you’d like.
Once you’re satisfied with your segment, click “Save” and your segment will be applied, allowing you to view performance of that traffic in any Google Analytics section that supports advanced segments.
All of this may seem like a lot to take in. At first it can be. But in time UTM links will become second nature. The insight you’ll gain from tracking all activities and campaigns will pay off many times in understanding what ad copy drives the most sales, what sites send the best traffic, and what content to create next that will be the most shared.
Do you use UTM tracking or have questions about setting it up? Let me know in the comments.


