 Choosing the right image format for publishing images on the web can be tricky. After all, you don’t want to spend hours and hours cleaning up a product image and making it look irresistible to your customers, only to have it distorted and ruined when you save it in a web format. More importantly, you want to make sure that your image file sizes are not too large, causing long download delays and potentially turning away customers.
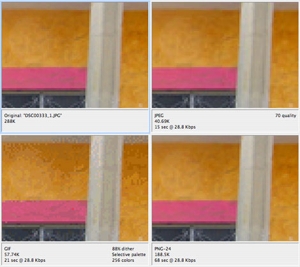
For the most part, the image formats used for web publishing are JPG, GIF, and PNG, with each format having its own strengths and weaknesses. For example, images in the PNG format will usually have a larger file size than their JPEG or GIF counterparts. However, PNG images offer enhanced transparency support that are not available with the other formats. Conversely, the JPG format does not offer any transparency support at all, yet offers the best compression option for complex images such as photography. Images with limited colors and complexity lend themselves to the GIF format.
Whether you are designing an entire website layout, creating product images, or just publishing a photo album it’s important that your images have the best balance that you can get between file size and visual quality. This tutorials aims to illustrate what to look for when deciding on an image format.
NOTE: In order to publish this tutorial, the video itself has been compressed, which can cause distortions that make some of the details in the tutorial difficult to see. Please download the ZIP file below to view each of the images in GIF, JPG and PNG format on your local machine.
Software Used: Adobe Photoshop CS2
Additional Files: PS_Tutorial_Images.zip
This video tutorial requires Flash Player version 8 or above.