Indexing is the precursor to ranking in organic search. But there are pages you don’t want the search engines to index and rank. That’s where the “robots exclusion protocol” comes into play.
REP can exclude and include search engine crawlers. Thus it’s a way to block the bots or welcome them — or both. REP includes technical tools such as the robots.txt file, XML sitemaps, and metadata and header directives.
REP can exclude and include search engine crawlers.
Keep in mind, however, that crawler compliance with REP is voluntary. Good bots do comply, such as those from the major search engines.
Unfortunately, bad bots don’t bother. Examples are scrapers that collect info for republishing on other sites. Your developer should block bad bots at the server level.
The robots exclusion protocol was created in 1994 by Martijn Koster, founder of three early search engines, who was frustrated by the stress crawlers inflicted on his site. In 2019, Google proposed REP as an official internet standard.
Each REP method has capabilities, strengths, and weaknesses. You can use them singly or in combination to achieve crawling goals.
Robots.txt

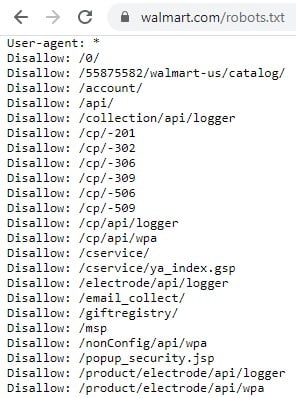
Walmart.com’s robots.txt file “disallows” bots from accessing many areas of its site.
The robots.txt file is the first page that good bots visit on a site. It’s in the same place and called the same thing (“robots.txt”) on every site, as in site.com/robots.txt.
Use the robots.txt file to request that bots avoid specific sections or pages on your site. When good bots encounter these requests, they typically comply.
For example, you could specify pages that bots should ignore, such as shopping cart pages, thank you pages, and user profiles. But you can also request that bots crawl specific pages within an otherwise blocked section.
In its simplest form, a robots.txt file contains only two elements: a user-agent and a directive. Most sites want to be indexed. So the most common robots.txt file contains:
User-agent: *

Disallow:
The asterisk is a wildcard character that indicates “all,” meaning in this example that the directive applies to all bots. The blank Disallow directive indicates that nothing should be disallowed.
You can limit the user-agent to specific bots. For example, the following file would restrict Googlebot from indexing the entire site, resulting in an inability to rank in organic search.
User-agent: googlebot

Disallow: /
You can add as many lines of disallows and allows as necessary. The following sample robots.txt file requests that Bingbot not crawl any pages in the /user-account directory except the user log-in page.
User-agent: bingbot

Disallow: /user-account*

Allow: /user-account/log-in.htm
You can also use robots.txt files to request crawl delays when bots are hitting pages of your site too quickly and impacting the server’s performance.
Every website protocol (HTTPS, HTTP), domain (site.com, mysite.com), and subdomain (www, shop, no subdomain) requires its own robots.txt file – even if the content is the same. For example, the robots.txt file on https://shop.site.com does not work for content hosted at http://www.site.com.
When you change the robots.txt file, always test using the robots.txt testing tool in Google Search Console before pushing it live. The robots.txt syntax is confusing, and mistakes can be catastrophic to your organic search performance.
For more on the syntax, see Robotstxt.org.
XML Sitemaps

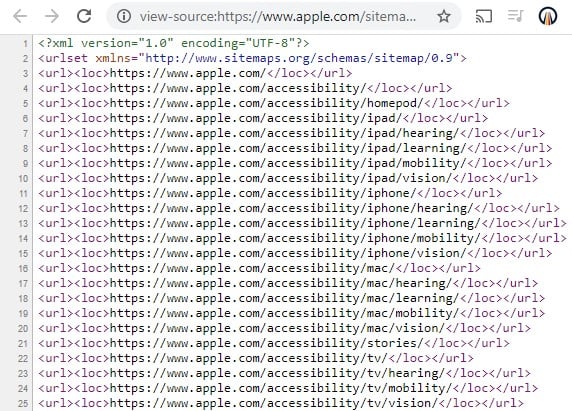
Apple.com’s XML sitemap contains references to the pages that Apple wants bots to crawl.
Use an XML sitemap to notify search engine crawlers of your most important pages. After they check the robots.txt file, the crawlers’ second stop is your XML sitemap. A sitemap can have any name, but it’s typically found at the root of the site, such as site.com/sitemap.xml.
In addition to a version identifier and an opening and closing urlset tag, XML sitemaps should contain both <url> and <loc> tags that identify each URL bots should crawl, as shown in the image above. Other tags can identify the page’s last modification date, change frequency, and priority.
XML sitemaps are straightforward. But remember three critical things.
- Link only to canonical URLs — the ones you want to rank as opposed to URLs for duplicate content.
- Update the sitemap files as frequently as you can, preferably with an automated process.
- Keep the file size below 50MB and the URL count below 50,000.
XML sitemaps are easy to forget. It’s common for sitemaps to contain old URLs or duplicate content. Check their accuracy at least quarterly.
Many ecommerce sites have more than 50,000 URLs. In these cases, create multiple XML sitemap files and link to them all in a sitemap index. The index can itself link to 50,000 sitemaps each with a maximum size 50 MB. You can also use gzip compression to reduce the size of each sitemap and index.
XML sitemaps can also include video files and images to optimize image search and video search.
Bots don’t know what you’ve named your XML sitemap. Thus include the sitemap URL in your robots.txt file, and also to upload it to Google Search Console and Bing Webmaster Tools.
For more on XML sitemaps and their similarities to HTML sitemaps, see “SEO: HTML, XML Sitemaps Explained.”
For more on XML sitemap syntax and expectations, see Sitemaps.org.
Metadata and Header Directives
Robots.txt files and XML sitemaps typically exclude or include many pages at once. REP metadata works at the page level, in a metatag in the head of the HTML code or as part of the HTTP response the server sends with an individual page.

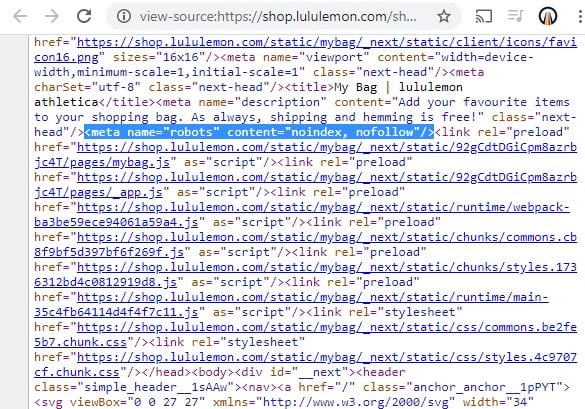
Lululemon’s shopping cart page uses a robots metatag to direct search engine crawlers not to index the page or pass link authority through its links.
The most common REP attributes include:
- Noindex. Do not index the page on which the directive is located.
- Nofollow. Do not pass link authority from the links on the page.
- Follow. Do pass link authority from the links on the page, even if the page is not indexed.
When used in a robots metatag, the syntax looks like:
<meta name="robots" content="noindex, nofollow" />
Although it is applied at the page level — impacting one page at a time — the meta robots tag can be inserted scalably in a template, which would then place the tag on every page.
The nofollow attribute in an anchor tag stops the flow of link authority, as in:
<a href="/shopping-bag" rel="nofollow">Shopping Bag</a>
The meta robots tag resides in a page’s source code. But its directives can apply to non-HTML file types such as PDFs by using it in the HTTP response. This method sends the robots directive as part of the server’s response when the file is requested.
When used in the server’s HTTP header, the command would look like this:
X-Robots-Tag: noindex, nofollow
Like meta robots tags, the robots directive applies to individual files. But it can apply to multiple files — such as all PDF files or all files in a single directory — via your site’s root .htaccess or httpd.conf file on Apache, or the .conf file on Nginx.
For a complete list of robots’ attributes and sample code snippets, see Google’s developer site.
A crawler must access a file to detect a robots directive. Consequently, while the indexation-related attributes can be effective at restricting indexation, they do nothing to preserve your site’s crawl budget.
If you have many pages with noindex directives, a robots.txt disallow would do a better job of blocking the crawl to preserve your crawl budget. However, search engines are slow to deindex content via a robots.txt disallow if the content is already indexed.
If you need to deindex the content and restrict bots from crawling it, start with a noindex attribute (to deindex) and then apply a disallow in the robots.txt file to prevent the crawlers from accessing it going forward.


