Email is one of the most potent tactics in the ecommerce marketer’s toolbox. Recent studies — which I addressed last week — indicate that email is a favorite activity for adult American Internet users.
MailChimp, a leading email-marketing service provider, has a terrific feature that allows a marketer to automatically send emails based on updates to an RSS feed. In this article, I am going to demonstrate how to set up a MailChimp RSS-to-email campaign.
How to Use RSS to Email
For the unfamiliar, an RSS feed allows web users to track new content on a website without actually visiting that site. Users do this by subscribing to an RSS “feed,” which is then read by an RSS “reader.” For ecommerce merchants, RSS feeds are a good way to syndicate regularly updated content, such as blog posts, product descriptions, and the details of sales and promotions.
MailChimp’s RSS-to-email feature converts an RSS feed to an email, which can save the time of composing a marketing email while still keeping consumers informed about your company. In fact, I believe that there are a number of excellent ways to use MailChimp’s RSS-to-email feature. For example, you can create product update emails based on a platform’s inventory, price, or new product RSS feed. For example, Consider Chronicle Books. This online retailer has three available RSS feeds, including a feed for its blog and its new releases.
Chronicle Books has RSS feeds that would make sense as an email campaign.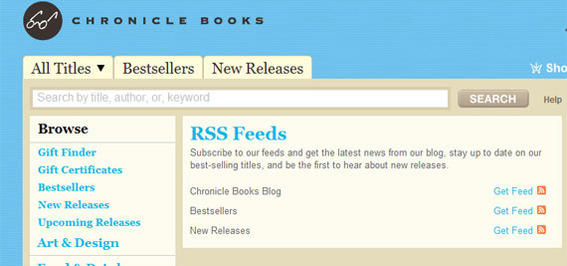
Chronicle could very easily use these feeds to produce automatically generated emails. Shoppers can register to get new product or blog updates, and once the RSS-to-email campaign is set up, Chronicle’s marketers don’t need to do anything extra.
Create an RSS-to-Email Campaign
I am, of course, assuming that you already have MailChimp account.
To begin, select “RSS-driven campaign” from the “create campaign” drop down menu in your MailChimp dashboard.
Start by selecting "RSS-driven campaign" from the MailChimp dashboard.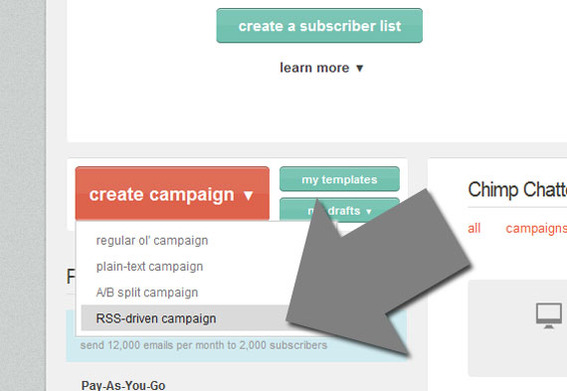
Next, you will paste the URL for the RSS feed you want MailChimp to use into the RSS feed form that appears on screen. For the example, I am going to use Chronicle Book’s blog RSS feed. I found the URL by navigating to the Chronicle Book RSS page and then clicking on the Chronicle Books Blog “Get Feed” link. Most good ecommerce platforms offer this sort of feature, so it is likely that your store has a feed that you can grab.
Copy and paste the desired RSS feed into the MailChimp form.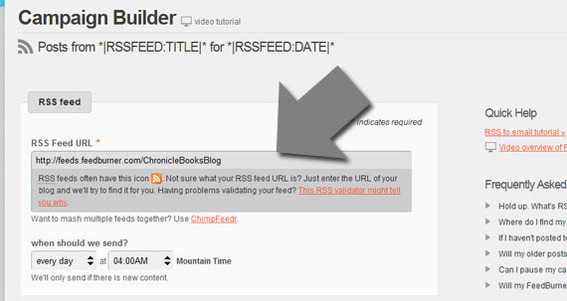
Next, you will want to set the frequency at which MailChimp will check the RSS feed for updates. In the case of a new product release, RSS-to-email campaign, you may wish to check daily. For a blog feed, you may want to send just once a week. The goal is to provide good information without overloading a subscriber’s inbox.
At this step, you should also consider the time of day you want MailChimp to check and send your emails.
Clicking “next” on the far right side of the page, will bring up the list selection page. Choose the list that should get the emails. Ideally, you will be creating a list of consumers who have specifically requested the email’s content. In our example, I am picking a test list.
Select the list that should receive the RSS-to-email campaign.
Selecting “next” will open the campaign information form. Here one selects the name of the campaign and the subject line, among other things. By default this subject line is the feed title and the feed date. You may also wish to use the title of a specific article from the feed. In this example, however, I left the default subject line in place.
The campaign information form establishes the email campaign subject lines, among other items.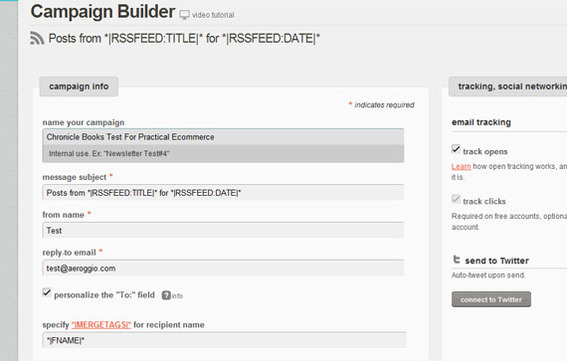
The next step — building the RSS-to-email campaign template — is the most time consuming. MailChimp’s templates can be a little hard to work with because they significantly limit what you are able to do. This is particularly frustrating for more experienced designers. Nonetheless, for folks not as familiar with HTML or CSS, there are some ready-made templates that offer something of a boost.
From the “design genius” page that is displayed next, I recommend selecting RSS templates and one of the three available layouts.
MailChimp offers three RSS-to-email template layouts.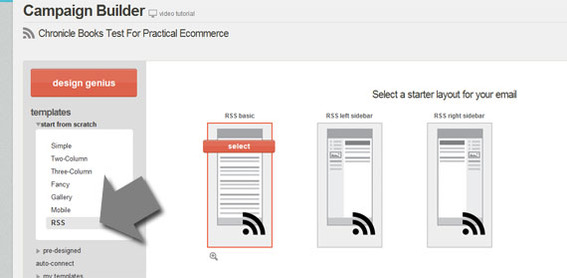
After a layout is selected, there is an opportunity to edit or update it. Without going into the details of color or font selection, I do want to mention MailChimp’s RSS tags, which are used to grab content from the RSS feed and place that content into the email template. Here is a rundown of the available RSS tags at the time of writing.
- |RSSFEED:TITLE| — Gets the RSS feed’s title.
- |RSSFEED:DATE| — Gets the feed’s publication date.
- |RSSFEED:URL| — Gets a web address for the entire feed.
- |RSSFEED:DESCRIPTION| — Gets a description for the entire feed. Be careful, not every RSS feed has this description available.
- |RSSITEMS:| and |END:RSSITEMS| — Surround any tags aimed at specific RSS feed items, such as an individual blog post or individual product, in a list of new products.
*|RSSITEMS:|*
…other RSS item tags
*|END:RSSITEMS|*
- |RSSITEM:TITLE| — Retrieves the title of a specific RSS feed item.
- |RSSITEM:DATE| — Gets the publication date of a specific RSS feed item.
- |RSSITEM:AUTHOR| — Represents the author of an individual RSS feed item, like a single blog post.
- |RSSITEM:COMMENTS_URL| — Retrieves the web address for any comments to the RSS items, if the URL is included in the feed.
- |RSSITEM:CATEGORIES| — Gets the name of any categories associated with a single RSS feed item. This could be a blog category or a product category like shoes or shirts.
- |RSSITEM:CONTENT| — Gets a summary of an individual RSS feed item’s content in HTML format.
- |RSSITEM:CONTENT_FULL| — Retrieves all of an individual RSS feed item’s content in HTML format.
- |RSSITEM:CONTENT_TEXT| — Does the same thing as |RSSITEM:CONTENT| except in plain text format.
- |RSSITEM:CONTENT_FULL_TEXT| — Does the same thing as |RSSITEM:CONTENT_FULL| except in plain text format.
- |RSSITEM:IMAGE| — Gets individual RSS feed item content that is explicitly identified as an image. In the case of blog feeds, images are frequently included in other content.
- |RSSITEM:ENCLOSURE| — Grabs information about individual item attachments. MailChimp says that the audio file for a podcast is an example of what this tag was intended for.
- |RSSITEM:ENCLOSURE_URL| — Grabs the web address for individual item attachments.
- |RSSITEM:SOURCE| — Gets a link to an external “source” if one is available in the feed.
- |RSSITEM:SOURCE_TITLE| — Gets the tile for a source link captured with |RSSITEM:SOURCE|.
To add one or more of these custom RSS tags to a MailChimp email layout, hover over the item you want to update and look for the “edit” link to appear.
MailChimp allows users to edit template sections.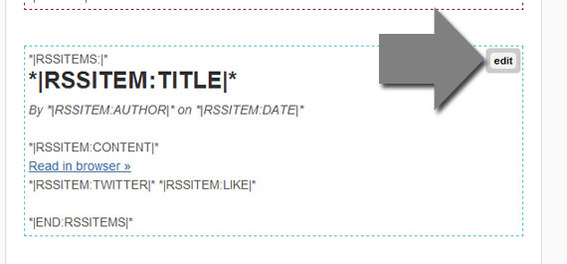
Selecting the “next” link twice will bring you to the final page of the RSS to email campaign. Choose “start RSS campaign” from the bottom left of the page and you are done. You may also use this page to see a preview of the email template.
Summing Up
In this article, I described how to set up an RSS-to-email campaign in MailChimp. This sort of campaign can be a good way to engage customers. Just be careful not to send too many emails and be sure that you are providing good content.