Facebook released Business Manager earlier this year. It is the social network’s newest tool to help business owners manage their presence on Facebook.
Primarily designed for large companies and advertising agencies that manage multiple pages and ad accounts, it is equally useful for smaller businesses because it puts all of your Facebook assets — pages, ads, apps and the people in your company who work with them — in one place.
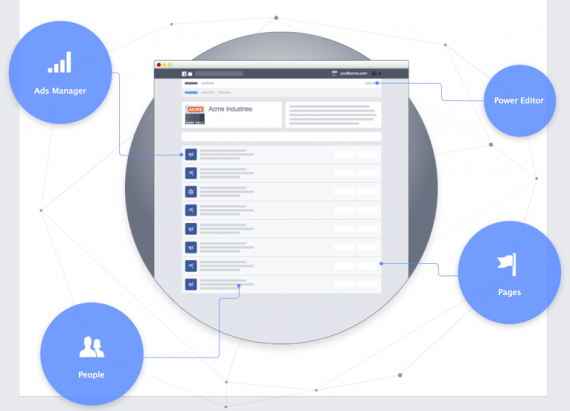
Business Manager puts all your Facebook assets in one place.
Benefits to Using Facebook Business Manager
Think of Business Manager as Facebook’s version of a social media management tool that streamlines workflows and provides greater clarity into what is taking place with your pages and ads.
Because all assets are housed in a single dashboard, you have more control in terms of assigning admin permissions and adding or removing pages and ad accounts. It also ensures your business and personal presence on Facebook is kept entirely separate.
Use of Business Manager can help reduce the time it takes to set up and manage your assets so you can focus on your business.
How to Set Up Facebook Business Manager
Set up Business Manager by following these five steps.
1. Before starting the setup process, make a list of the pages, ad accounts, and apps you want to include in Business Manager, along with the work email addresses of the people you want to add as administrators.
2. Go to Business.facebook.com and log in to Facebook using your personal Facebook username and password. That is only so that Facebook can verify your identity. No one can see anything from your personal account on Business Manager.
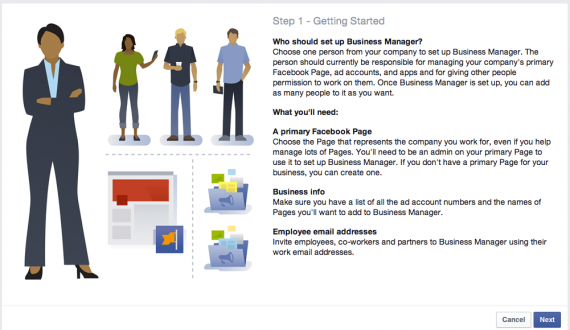
Log in to Business Manager using your personal Facebook username and password.
You will see an introductory page that contains some information about Business Manager. Click the “Next” button located in the lower right-hand corner to continue the setup process.
3. Provide some basic information about your business to customize your experience in Business Manager.
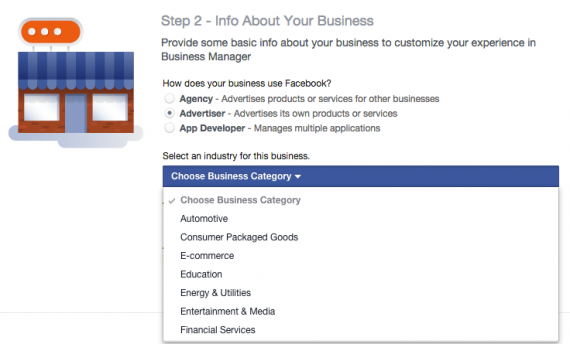
Provide some basic business information.
Choose how your business uses Facebook — whether as an agency, advertiser or app developer — how many people will work in Business Manager, and how many pages, ad accounts, or apps to include.
Unless you are an agency owner or app developer, choose “Advertiser.” You will be asked to select an industry for the business. “Ecommerce” is one of the options.
Click the “Next” button to continue.
4. Select your business name and Facebook page.
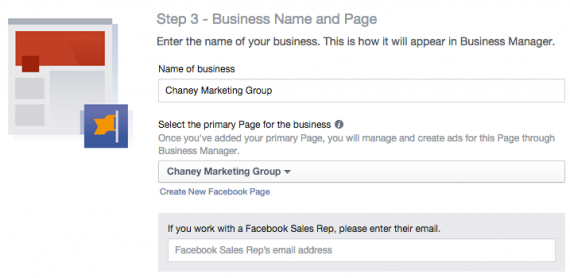
Insert your business name and Facebook page.
You will need to input the name of your primary Facebook page, which is the one that best represents your business. If your business does not have a Facebook page, you can set one up in Business Manager.
Click “Next” to proceed to the final step.
5. Add your name and business email address.

Add your business name and email address.
As a reminder, nothing from your personal Facebook profile will appear in Business Manager.
Click “Create Business Manager” to complete the setup process. The Business Manager administrative console will appear. Facebook also presents a pop-up window introducing a “how-to” guide to help familiarize you with the platform.
How to Use Facebook Business Manager
Once inside the console, go to the “Settings” page, which is where you will manage all aspects of your Facebook business presence.
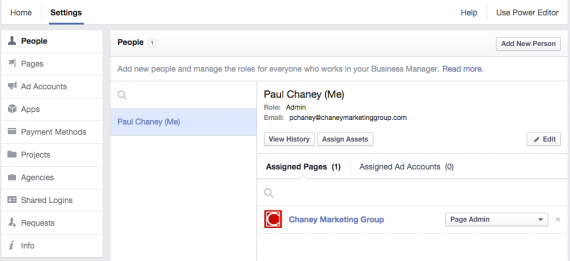
Go to the “Settings” page to manage your Pages, ads, apps, and people.
It consists of the following sections.
- People. Add new administrators to manage pages or advertising accounts. You will assign people to one of two roles: admin or employee. Admins can manage all aspects of the business settings, including modifying or deleting the account and adding or removing people. Employees can see all of the information in the business settings but cannot make changes.
- Pages. Add all the pages you want to administer in Business Manager.
- Ad Accounts. All of your advertising accounts will appear here. If none show up, you can add them.
- Apps. Any Facebook apps you happen to have are listed here.
- Payment Methods. Add payment methods to associate with your ad accounts.
- Projects. Assign people to advertising accounts and pages by organizing them under projects. Instead of assigning people to individual assets, Business Manager enables you to give them permission to work on everything for which they are responsible.
- Agencies. Give any ad agency you work with permission to access some of your Facebook business assets so the agency can manage pages or run ads. Any agency you have given access to will be listed here, along with the business assets it manages.
- Shared Logins (Gray Accounts). If you use shared logins (also called gray accounts) to manage Facebook pages and ad accounts, add them to Business Manager.
- Requests. If another Business Manager wants access to any of your pages, ad accounts or other assets, you will receive a notification that you can choose to accept or decline.
- Info. General information about your assets is listed here.
- Power Editor. In the upper right-hand corner is a shortcut to Facebook Power Editor, which you can administer through Business Manager.
Conclusion
Facebook Business Manager is a more secure and efficient way to manage your pages, ad accounts, and apps in one place. You can see who is working on your business and manage the permissions they have on your pages, ad accounts, and apps.
Facebook has a detailed set of FAQs and help files should you require more information or need further assistance.


