Facebook’s Power Editor can help administrators manage multiple ad campaigns and Pages with greater efficiency. Facebook created it primarily for agencies with multiple client accounts. But Power Editor offers benefits for merchants too.

Power Editor saves time managing multiple ads and campaigns.
This article outlines Power Editor’s key benefits and features, and explains how to install and use the tool.
Benefits to Using Power Editor
According to Facebook, Power Editor makes it easy to create, edit, manage and optimize ads, campaigns, and Page posts in bulk, across a number of different ad accounts and Pages. Advertisers can use Power Editor to buy placements in the news feed, the most engaging place on Facebook.
Power Editor helps with mass editing of campaign settings, targeting, bids, budgets, flight dates, and creative elements across ads, campaigns, and even accounts. Users can monitor ad statistics to optimize ads and campaigns from within the tool itself. Create and schedule posts for later publication.
Power Editor can work with Excel, where users can copy and paste ads and campaigns. It can also help with the following tasks.
- Save time. Mass-edit ads and Page posts across campaigns, accounts and Pages, and create ads in bulk.
- Analysis. Optimize from the tool by sorting ads by key statistics and performance.
- Manage offline. Copy and paste ads and campaign data from Power Editor to Excel, and vice-versa.
- Adjust news feeds. Select specific news feed placements in desktop and Facebook’s mobile application for Page post ads and sponsored stories;
- Locate prospects. Use a feature unique to Power Editor called “custom audiences” to find your offline audiences on Facebook;
- Automate Page posts. Easily create, schedule and promote Page posts.
How to Install Power Editor
Power Editor works only within Google’s Chrome browser; the application runs locally on a computer, not on Facebook’s Ads Manager. Thus, changes have to be uploaded to Ads Manager to go into effect.
Take the following steps to install Power Editor.
- Open the Chrome browser in Mac or Windows. Here’s the latest version of Chrome.
- Visit your Facebook Ads Manager.
- Click on the Power Editor tab located in the left-hand column of Ads Manager. Install Power Editor and open it.
- Once in Power Editor, click “Download.” You can choose to download all your accounts or select only the ones you want.
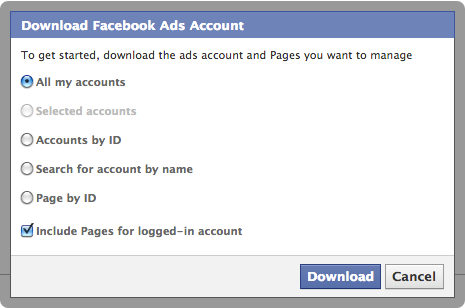
Download all accounts or select those you want to use.
About Custom Audiences
The custom audiences feature lets you upload a list of email addresses or phone numbers from your customer database to find them on Facebook.
You can create a custom audience representing any group of customers or prospects that you’d like to reach with targeted Facebook ads. For example, you could run a campaign to get more Likes for your Page, targeted at current customers.
You can upload either .csv or .txt files to Facebook, which encrypts the data using hashes (#), so users’ identities and information are protected. Facebook then runs this list against its own hashed database to find matches that can be targeted with ads. When this is done, the data is discarded, so that neither side collects more information about users. Hashed data cannot be decrypted.
How to Set Up a Custom Audience
- Identify groups of people from your contact management system. This might be subsets of current or lapsed customers, prospects, loyalty club members, or anyone you want to reach with ads.
- Use Power Editor to find these people on Facebook. Input an email or phone list representing your segments into the tool. The list will be hashed before being sent to Facebook. The system will match the encrypted data against Facebook’s active users, and build a custom audience in your account with everyone that matches your list.
- Reach the exact people you want with Facebook ads that are specific to your objectives for that audience. You can also overlay other Facebook targeting parameters such as geographic location, gender, age and interests — to further refine your audience.
Navigating in Power Editor
Power Editor offers many more targeting and optimization options than Ads Manager.
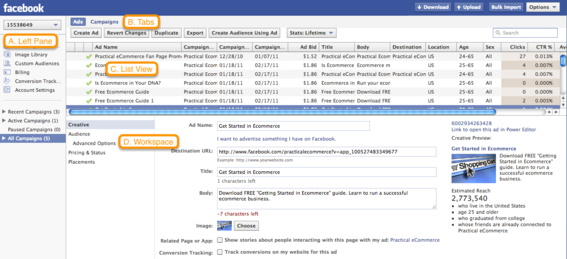
The Power Editor interface contains four sections.
A. Left pane. The left-hand pane contains all your accounts and campaigns. Select an account in the drop-down menu in the left pane to view ads filtered by campaign. After selecting the account, choose the campaign you want to focus on. You’ll see all the ads associated with it in the list view on the right.
B. Tabs. You can toggle between ads, campaigns, accounts, images, Page posts, and custom audiences using the tabs.
C. List view. The list view displays all ads for the campaigns and accounts you selected in the left-hand column. You can toggle between “ads” and “campaigns” to see different views.
D. Work space. “Work space” displays editable fields about ads and campaigns. Clicking on an ad or campaign in the list view will automatically open up the ad or campaign’s details in the work space.
Power Editor Buttons and Features
Power Editor buttons and features.
Settings. The Settings option, which is located under the “Options” drop-down menu in the upper left-hand corner, enables you to customize the columns that are shown in the list view of Power Editor. You can select which ad columns and campaign columns to display. These columns include ad parameters such as price, as well as performance metrics like click through rate.
Power Editor allows administrators to create, schedule and promote posts.
Bulk import. This option allows you to import a properly formatted Excel file or cells that have been copied and pasted from an Excel file into Power Editor. You can also use bulk import for individual images or a zip file of multiple images.
Download. You can download data from the ads system into Power Editor for specific accounts.
Upload. Uploads all edits made in Power Editor back to Ads Manager.
Create ad, Create campaign. Click this button to create a new ad or campaign.
Revert changes. This allows you to revert to the latest version of a selected row before any edits were made.
Duplicate. After selecting a row or set of rows in the list view, “duplicate” allows you to create an identical copy. For example, if you have selected an ad in the list view and you then click the duplicate button, another ad containing the same parameters will be created with a version number appended to the ad name. Duplicating a campaign creates an identical copy of that campaign and the ads within that campaign.
Export. This exports rows that have been selected in the list view into a CSV file.
Stats. Select the time period for which all metrics are displayed.
Column headers. You can sort rows in list view by any column header.
Search. Dynamically filter rows in list view based on query.
Page Post Management
Not only does Power Editor manage multiple ads and campaigns, it allows Page administrators to create, schedule, and promote posts to targeted groups. This provides greater control over who sees Page content and saves time by scheduling posts in advance.
Conclusion
Power Editor can manage ads, campaigns and posts across multiple accounts in a timesaving manner. In this article, I have described only a few of its key features and benefits.
To learn more, download Facebook’s PDF guide, which goes into much greater detail. Facebook also provides a help section that answers questions about the tool.