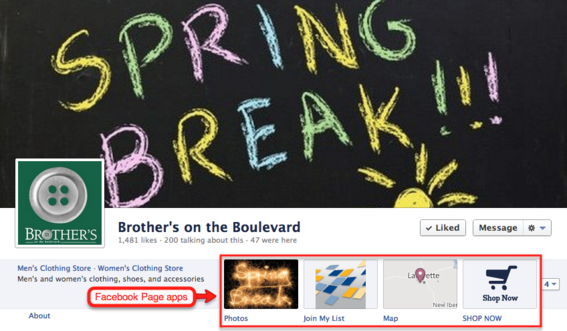
Now that Facebook has transferred commercial Fan pages to the new Timeline format, links to custom tabs — now called “apps” — reside in a row below the cover image. These were previously located in the left-hand column, with small icons. No matter how many apps you have, only four appear in the row, accompanied by a button with a drop-down arrow that reveals others.

Facebook Page apps are now located beneath the cover image.
Given the limited number, it is important to feature apps that best promote your business interests and increase sales. These could include such apps as a welcome page, shopping cart, contest or special offer. Fortunately, the new layout gives you the opportunity to customize the icon image associated with the app, as well as its name and position.
Facebook App Icon Image Customization
With the exception of standard Facebook apps such as photos, Likes and maps, you can customize app icons to contain most any image or message. This is good news, since Facebook prohibits page cover images from containing promotional elements like web addresses, telephone numbers or specific calls to action.
The screenshots below show three examples of app icon customization.
Brother’s on the Boulevard
Clothing retailer Brother’s on the Boulevard uses two custom app icons — “Join My List” and “Shop Now” — in the row of four. Join My List links fans to a page where they can opt-in to the store’s email newsletter. Shop Now takes fans to a Facebook-enabled shopping cart.

Brother’s on the Boulevard features two custom apps.
Pepsi
Pepsi features two custom apps: a Facebook store selling branded apparel, accessories and collections; and special offers and coupons.

Pepsi custom app icons link to an online store and special offers.
Toddler Toddler
Children’s crafts store Toddler Toddler has a single custom app that contains a strong promotional message and call to action.

Toddler Toddler custom app icon has strong promotional message.
How to Change an App Icon
Take the following steps to change an app icon.
- Click the “Admin Panel” button located in the upper right-hand corner of your Facebook page.
- Click “Manage” located at the top of the admin panel. This produces a drop-down menu.
- From the menu, click “Edit Page,” which takes you to the administrative console.
- In the left-hand column, click “Apps.” This takes you to a page containing a list of apps.
- Select the app containing the image you wish to change, then click “Edit Settings.”
- This will open a dialog box that allows you to change both the app image and name. To change the image, click “Change.” This takes you to a page that shows you the current image. To the right of the image you will once again see the word “Change.”
- Click “Change.” Another dialog box opens where you can upload a new image from your hard drive.
Image Guidelines:
- Images can be in JPG, GIF, or PNG file format.
- Images should no larger than 111×74 pixels. Larger images will be resized. Also, the file size limit is 5 MB.
Rearrange App Icon Position
Only four app icons appear in the row, one of which is “Photos.” It takes up the first position and cannot be moved. That leaves you with three, which you can rearrange to feature the most prominent. Use the following steps to reposition the apps.
- Click the button located to the right of the four icons to show up to 12 apps.
- Mouseover the app you would like to include in the row of four. This reveals a pencil icon.
- Click the pencil icon, which opens a menu that gives you the option to swap positions with any of the other apps.
- From the list of apps, click on the one with which you would like to change position.
Conclusion
Take advantage of the row of four apps to create and position custom icons to draw attention to your Facebook shopping cart, special events, discounts and special offers. Since many small businesses have not done this, it gives you an extra edge over the competition.
Coming Up
Because the Photos app icon takes first position in the row of four, visitors of your page are likely to click it. In next week’s article, I will cover strategies for using the Photos app to drive traffic to your website and increase product sales.


