Not using gzip on your web server? You should be. Enabling gzip compression could improve initial page load times by as much as 90 percent. Faster web pages may lead to better search engine rankings, an increase in site traffic, and more sales.
Gzip compression is a fairly common practice, so it may be the case that your company’s web server is already using it. To find out, use a tool like Google’s PageSpeed Insights, a page speed browser plugin, or any number of free gzip compression tests, such as Varvy’s gzip compression test.
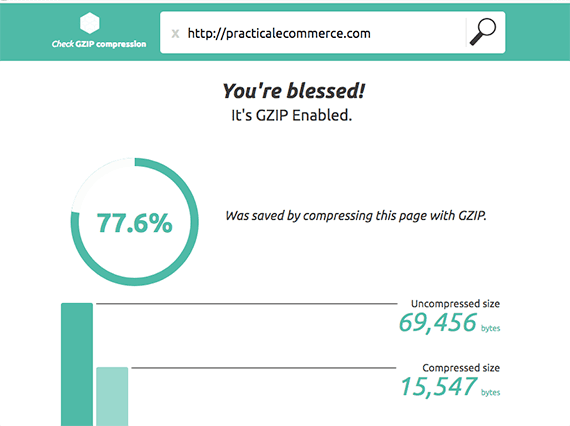
It is worth a few seconds to test, to ensure your site is using gzip compression.
If your site is using gzip, you can focus on other ways to boost speed and attract more customers, for example, check out HTTP/2. If not, enable and test gzip as soon as possible.
How Gzip Works
Gzip is a file compression method that works well on text files, such as HTML, CSS, JavaScript, and JSON. The technique has been around for more than 20 years. It remains one of the most popular compression formats for the internet because it can be encoded (compressed) and decoded (decompressed) very quickly, while still producing small files.
The compress a file, gzip looks for redundant patterns using the LZ77 compression algorithm and then uses a “Huffman tree” to reduce the number of characters needed to express those redundant patterns.
Your company’s web server can be configured to automatically gzip applicable files before sending them to a user’s web browser so that a much smaller file is sent to someone visiting your online store, for example.
What to Compress
A bit later in this article, you will learn how to enable gzip compression on two of the most popular web servers. In each case, you will have an opportunity to specify which sorts of files you want the server to compress. This is a list of MIME types — i.e., document and file types — you should considering compressing.
- HTML – text/html
- CSS – text/css
- JSON – application/json
- JavaScript – application/javascript and text/javascript
- XML – application/xml and text/xml
- SVG – image/svg+xml
Depending on your company’s site, you may also want to compress fonts, RSS feeds, and similar. You can find a complete list of MIME types on the Internet Assigned Numbers Authority website.
Apache Web Servers
The Apache HTTP Server, or simply Apache, is the most popular web server. Some 44 percent of all active sites used Apache in February of 2018, according to a Netcraft survey of 1.8 billion websites.
For Apache, you will use the mod_deflate module to allow for output compression.
This module is part of the Apache 2 core package, so your server should have it installed already. On Ubuntu, it is probably located at:
/usr/lib/apache2/modules/mod_deflate.so
To enable mod_deflate go to the module configuration file. You are likely to find it at:
/etc/apache2/mods-available/deflate.load
Look for the following line.
LoadModule deflate_module /usr/lib/apache2/modules/mod_deflate.so
If mod_deflate is not enabled, this line will be commented out, simply remove the hash (#) at the front of the line to enable it. Next, restart Apache.
sudo apachectl restart
Or
sudo service apache2 restart
Configure this module in the default configuration file, which should be located at:
/etc/apache2/mods-available/deflate.conf
Your directive will look something like this.
<IfModule mod_deflate.c>
    <IfModule mod_filter.c>
       AddOutputFilterByType DEFLATE text/html text/plain text/xml
       AddOutputFilterByType DEFLATE text/css
       AddOutputFilterByType DEFLATE application/x-javascript application/javascript...
       AddOutputFilterByType DEFLATE application/rss+xml
       AddOutputFilterByType DEFLATE application/xml
    </IfModule>
</IfModule>
Notice that each AddOutputFilterByType parameter allows you to specify a MIME type.
Nginx Web Servers
Some 21 percent, or about one in five active websites, use Nginx, according to the Netcraft survey. Nginx has a helpful guide for enabling its gzip module. The steps described below are based on this guide.
To begin, navigate to the nginx.conf file on your server. For Ubuntu, as an example, this is probably located at:
/etc/nginx/nginx.conf
You can open and modify this file with the command:
sudo nano /etc/nginx/nginx.conf
Locate the gzip section. This section in the configuration file may look similar to the example below. Remember that a hash (#) comments out a line. So a line starting with this symbol is not being read.
##
# Gzip Settings
##

gzip on;
gzip_disable "msie6";

# gzip_vary on;
# gzip_proxied any;
# gzip_comp_level 6;
# gzip_buffers 16 8k;
# gzip_http_version 1.1;
# gzip_types text/plain text/css application/json ...
The gzip_on parameter enables the default compression for text/html MIME types. Uncomment the other parameters and add one more, gzip_min_length.
This parameter tells Nginx not to bother gzipping a file unless it is larger than the specified size. Speed is our goal and relatively small files might take longer to compress and decompress than they would if you just sent them. Try 256 for your gzip_min_length value.
The resulting configuration file might look like this:
##
# Gzip Settings
##

gzip on;
gzip_disable "msie6";

gzip_vary on;
gzip_proxied any;
gzip_comp_level 6;
gzip_min_length 256;
gzip_buffers 16 8k;
gzip_http_version 1.1;
gzip_types text/plain text/css application/json ...
You will need to reload Nginx.
sudo systemctl reload nginx
Or
sudo service nginx reload
To learn more about what each of these gzip parameters controls, see the Nginx documentation.