Learning the ins and outs of popular social sharing site Pinterest takes only minutes, but can have a positive effect on ecommerce marketing.
Pinterest may be the hottest property in social media sharing, with a growth rate that rivals Facebook, Twitter, and Google+. It also has the potential to be an excellent opportunity for marketers, which I addressed last week, in “Use Pinterest to Raise Consumer Interest.”
In this article, I’ll offer step-by-step instructions for Pinterest’s most common tasks. To get started with Pinterest, you will first need an account there, which at the time of writing was available by invitation. You can request an invitation from the Pinterest site.
How to Add the Pinterest Bookmark Bar Widget
Pinterest has two buttons that it calls “Pin It”. One of these is added to a browser’s bookmark bar; the other is added to a website. To fight confusion, you can refer to the former as Pinterest’s bookmark bar widget.
To get this bookmark bar widget, you will need to have your browser’s bookmark tool bar showing.
In Google Chrome, go to settings (the wrench icon on the right), “Bookmarks,” “Show Bookmarks Bar.”
In Chrome the "Show Bookmarks Bar" option is under "Bookmarks" in the settings menu.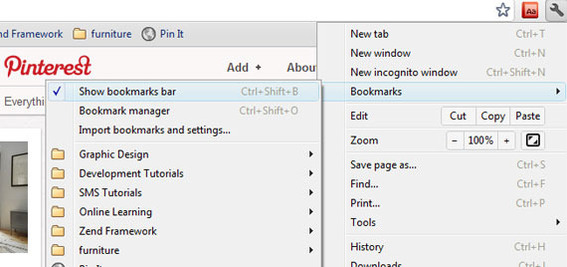
In Firefox, click the “Firefox” menu at the top left and go to “Options.”
Firefox has its bookmark bar under "Options."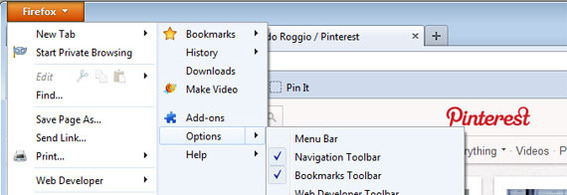
In Internet Explorer 9, right click at the top of the screen to include the “Favorites Bar.”
Internet Explorer 9 calls its bookmark bar a "Favorites Bar."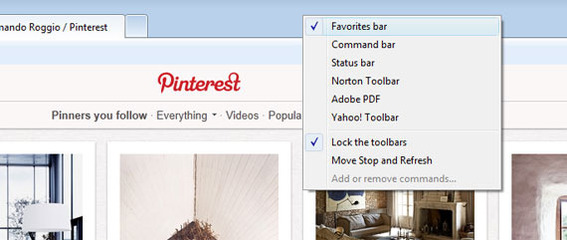
In Safari, open the “View” menu and click “Show Bookmarks Bar.”
Safari has its "Show Bookmarks Bar" option under "View."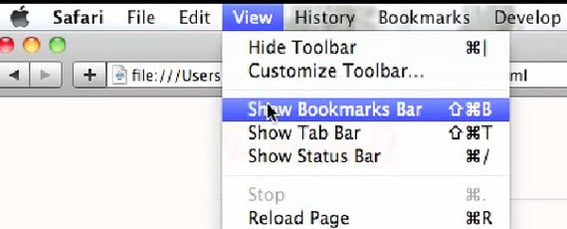
In Opera, open “Menu,” then “Toolbars,” to find this option.
Opera’s Bookmark Bar option is under toolbars.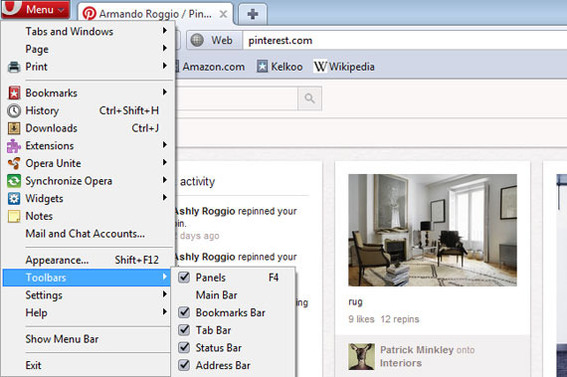
Once your bookmark bar is in view, navigate to the Pinterest “Goodies” page. Near to top of this page is the “Pin It” button in a light blue bar. Drag this “Pin It” button to your bookmark bar. Internet Explorer is an exception. For IE, right click and add to favorites.
Drag the "Pin It" button to your bookmark bar.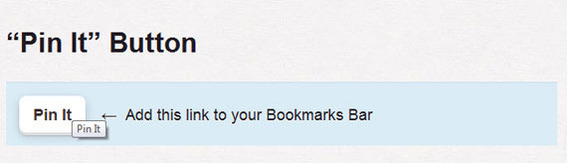
How to Pin an Image or Video with the Pin It Button
Pinterest is a place for sharing interesting pictures and videos, so it is reasonable that the service offers a few ways to pin.
First, you can pin using the “Pin It” bookmark bar widget described above. When you find something interesting on the web, click the “Pin It” button on your browser’s bookmark bar.
The bookmark bar "Pin It" button may be the easiest way to pin.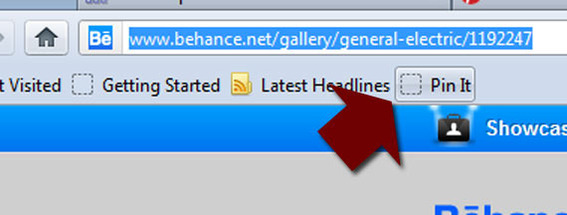
When you click the “Pin It” button, you will see a list of the available images, simply select the image or video you want to pin.
Pinterest searches for images or videos on page when you click the "Pin It" button.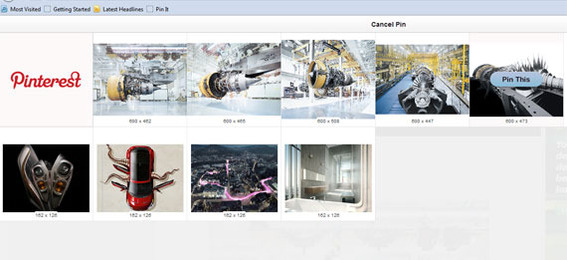
Once an image or video is selected, Pinterest opens a dialogue page, asking you to provide a brief description and select a category for the pin. Clicking, “Pin It” submits the pin.
Pinterest opens a "Create Pin" dialogue box.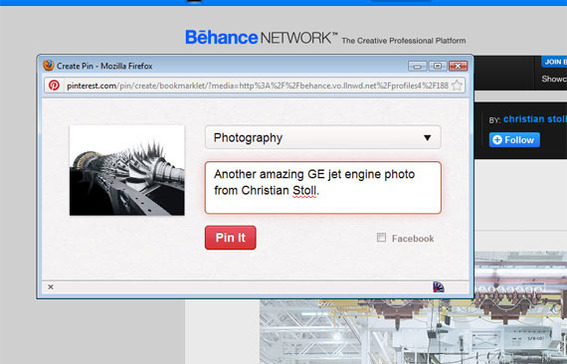
Once the pin is complete, Pinterest gives you the option to share your pin on Twitter or Facebook.
As a bit of a warning, the “Pin It” bookmark bar widget may have some trouble finding images or videos on some sites.
Not every page will work with the Pinterest "Pin It" bookmark bar widget.
How to Pin an Image or Video from the Pinterest Page
Separately, you can also add pins from the Pinterest page. Simply click “Add +” in the upper right side of any Pinterest page.
Pinterest also has an "Add +" button on its pages.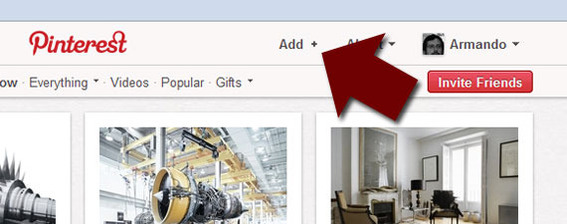
When you click the “Add +” button, Pinterest opens a dialogue window, offering three options. The first two relate to pinning: You can pin an item (a) with a URL or web address or (b) by uploading a file.
Pinterest will allow you to pin via a URL or a file upload.
If you select “Add a pin,” which adds a pin via a URL, Pinterest presents a form, asking you to paste in the URL you want it to search for images.
Pinterest asks for a URL to search for images.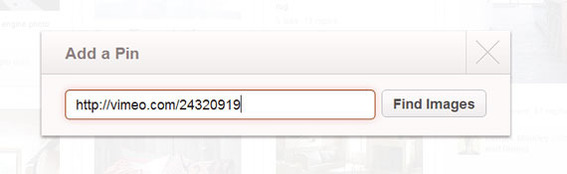
Choosing the upload option, allows the user to browse local or network drives for images or video.
At the end, Pinterest will again present a dialogue box seeking a pin description and category.
How to Create a Custom Board
In Pinterest, each pin is organized onto a board. Pinterest will create a few boards for you when you first join, but over time you will want to create your own boards.
New boards are created using the “Add +” button on any Pinterest page. When you click “Add +,” Pinterest options a dialogue window. The first two options relate to adding pins. The third option is for creating a new board.
New boards are created in the "Add +" dialogue window.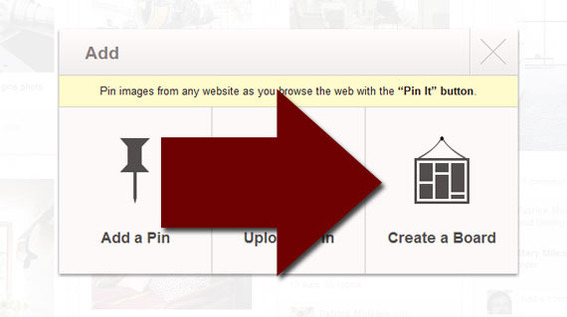
When you click “Create a Board,” Pinterest opens a short form, asking for a board name and category. You can also set up more than one contributor to a board.
Pinterest requires a board name and category.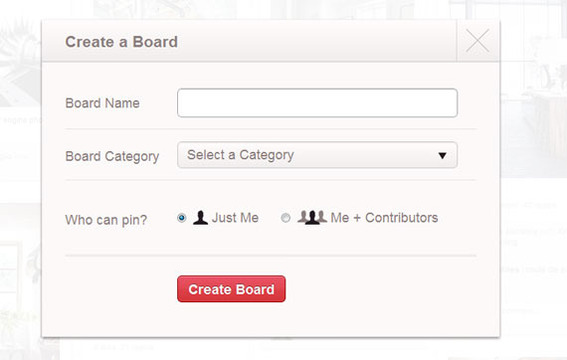
How to Like, Repin, or Comment
Pinterest allows users to like, repin, or comment on items. To do this, simply hover over a pin from another Pinterest user. Pinterest will show you options to like, repin, or comment on the post.
Hover over an item to repin or like it.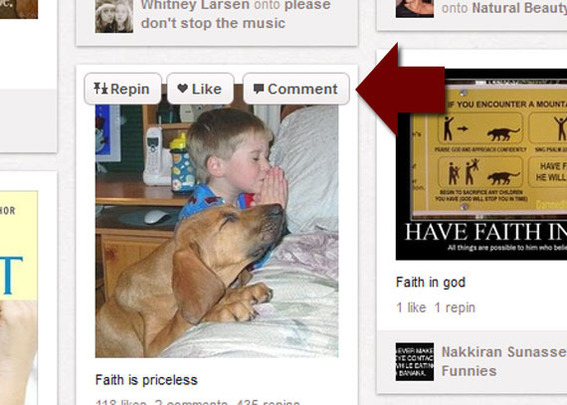
How to Add the ‘Pin It’ Button to Your Site
Pinterest also has a JavaScript-based “Pin It” button that can be added to your web pages.
The simplest way to add a “Pin It” button to your site is to use the Pinterest “Pin It” button tool found on the Pinterest “Goodies” page.
Pinterest has a tool for creating "Pin It" buttons that you can embed on your site.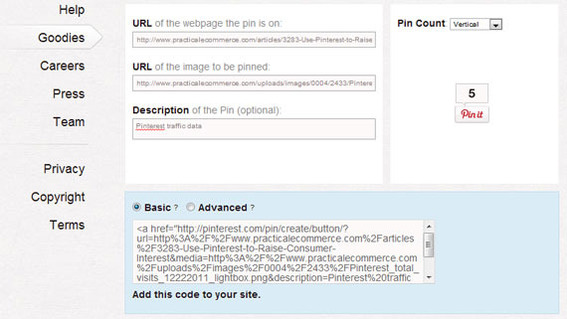
The resulting JavaScript code should be pasted into your site’s HTML markup.
Here is the code for an example “Pin It” button link. It consists of a standard HTML anchor element and a script element.
<a href="http://pinterest.com/pin/create/button/?url=http%3A%2F%2Fwww.practicalecommerce.com%2Farticles%2F3283-Use-Pinterest-to-Raise-Consumer-Interest&media=http%3A%2F%2Fwww.practicalecommerce.com%2Fuploads%2Fimages%2F0004%2F2433%2FPinterest_total_visits_12222011_lightbox.png&description=Pinterest%20traffic%20data" class="pin-it-button" count-layout="horizontal">Pin It</a>
<script type="text/javascript" src="http://assets.pinterest.com/js/pinit.js"></script>
The anchor has a rather long looking URL associated with it.
http://pinterest.com/pin/create/button/?url=http%3A%2F%2Fwww.practicalecommerce.com%2Farticles%2F3283-Use-Pinterest-to-Raise-Consumer-Interest&media=http%3A%2F%2Fwww.practicalecommerce.com%2Fuploads%2Fimages%2F0004%2F2433%2FPinterest_total_visits_12222011_lightbox.png&description=Pinterest%20traffic%20data
This URL is encoded so that some special characters have been replaced. For example, each “%2F” in the URL stands for “/” and each “%20” stands for a space. For the purposes of this article, it may help to look at the URL without the encoded characters.
http://pinterest.com/pin/create/button/?url=https://www.practicalecommerce.com/articles/3283-Use-Pinterest-to-Raise-Consumer-Interest&media=https://www.practicalecommerce.com/wp-content/uploads/images/0004/2433/Pinterest_total_visits_12222011_lightbox.png&description=Pinterest traffic data
When this un-encoded URL is divided further, it starts to make sense. For example, the first part points to a file on the Pinterest site. This file handles new pin requests.
http://pinterest.com/pin/create/button/
The URL next passes some data to that file. The “?” marks the beginning of the data for the Pinterest file to process. The first parameter is “url” and it is set to the address for the page that the “Pin It” button will be placed on.
url=https://www.practicalecommerce.com/articles/3283-Use-Pinterest-to-Raise-Consumer-Interest
The next parameter is “media,” and it provides the link directly to the image that should be pinned.
media=https://www.practicalecommerce.com/wp-content/uploads/images/0004/2433/Pinterest_total_visits_12222011_lightbox.png
The last parameter is “description,” and it populates the description field in the pin dialogue window.
description=Pinterest traffic data
The anchor element also has a class and an attribute called “count-layout.”
class="pin-it-button" count-layout="horizontal"
The “count-layout” attribute determines if the Pinterest count — that is, the number of times a page has been pinned — should be displayed to the right of the button (horizontal), above the button (vertical), or not at all (none).