This article offers a step-by-step approach to setting up Google Analytics tracking for an ecommerce website.
Step 1: Creating Google Analytics account
This is the most basic of steps: Head over to Google.com/analytics and sign up for Google Analytics account.
Step 2: Properties and Views Architecture
Start by taking note of all domains and subdomains that you are about to install the Google Analytics tracking code on. For each, decide if you’d want to give it a unique Property ID, identified by the ID UA-#######-#.
As a rule, if the main domain and subdomains are interconnected and related in terms of goals and business objectives, then they should all use the same Property ID. That way you may want to have (a) all data from the domain and subdomains collected from the same Google Analytics property, and (b) additionally create a separate view for the domain and subdomain (note the image below).

Assign Property IDs to domain and subdomains.
However, if the sites have different goals you may consider creating a separate Google Analytics property for each of them (as show below).
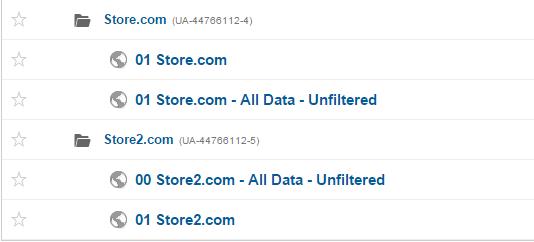
If your domains and subdomains have different goals, consider separate Property IDs.
Step 3: Insert Google Analytics Tracking Code or Google Tag Manager
To parse traffic data from your site to Google Analytics, you need to place either Google Analytics Tracking Code (GATC) or GTM (Google Tag Manager) on all pages of the site. You can find GATC at the Property level setting in Google Analytics (as shown below).
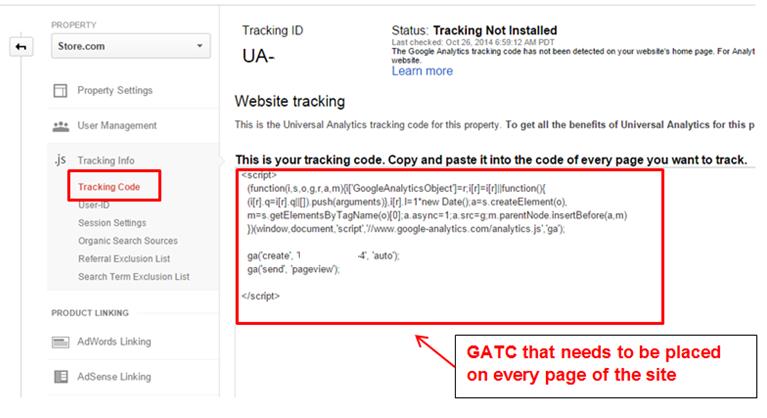
GATC is at the Property level setting.
To use Google Tag Manager to send the data to Google Analytics, you will need to create a GTM account.
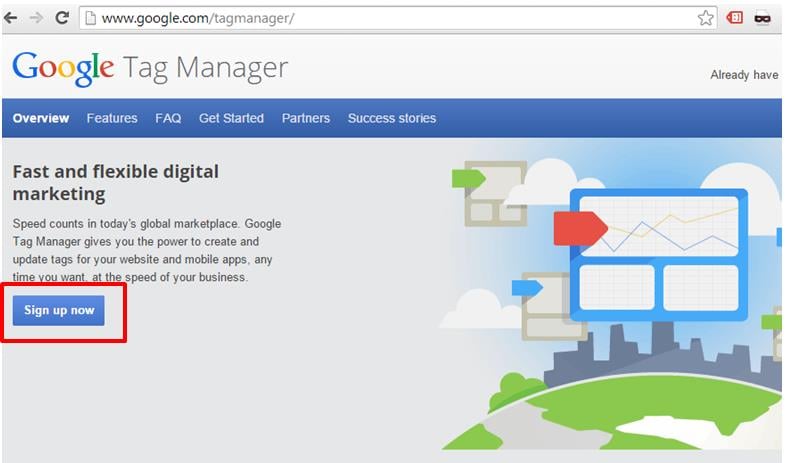
Using Google Tag Manager requires a separate account.
As a next step you will need to create a container for your website and place the code — which is automatically generated — on all pages of the site.

Place the GTM code on your website.
After the GTM snippet is placed on the website you will need to create a tag to fire on all pages that will send all the data to Google Analytics, as shown below.
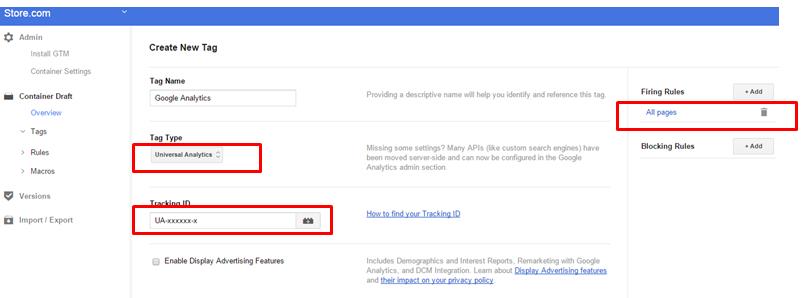
Create a tag to fire on all pages that will send all the GTM data to Google Analytics.
Step 4: Setting up Ecommerce Tracking Using GATC or GTM
A must-have for any ecommerce site is ecommerce tracking — i.e. sending transaction details to Google Analytics for the analysis of data in context of other metrics and dimensions available in Google Analytics, such as performance by traffic sources, keywords, and countries and regions.
First, you will need to enable ecommerce data collection in your Google Analytics account. It is done at the View level; note the image below.
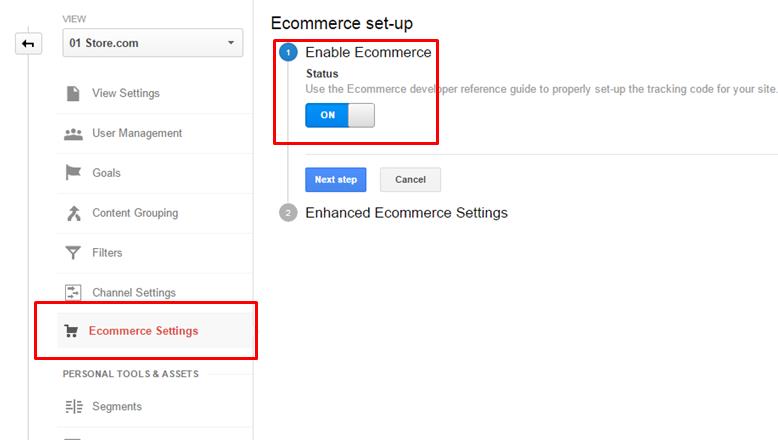
Enable ecommerce data collection in your Google Analytics account.
Next, place ecommerce tracking using either Google Analytics Tracking Code or Google Tag Manager — depending on which option you chose.
For the Tracking Code method, place the code on the thank-you page (or confirmation page) of your website.
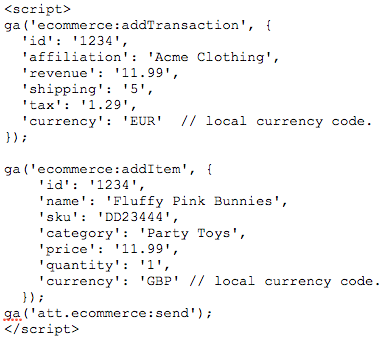
For the Tracking Code method, place the code on the thank-you or confirmation page.
// If you opted to use Google Tag Manager to send data to Google Analytics, transaction details on your thank-you page should be pushed to the dataLayer in GTM, as follows.

Using Google Tag Manager, transaction data on your thank-you page should be pushed to the dataLayer.
After the above code is placed you will need to create a transaction tag in GTM container — to fire on the thank-you page — as shown below.
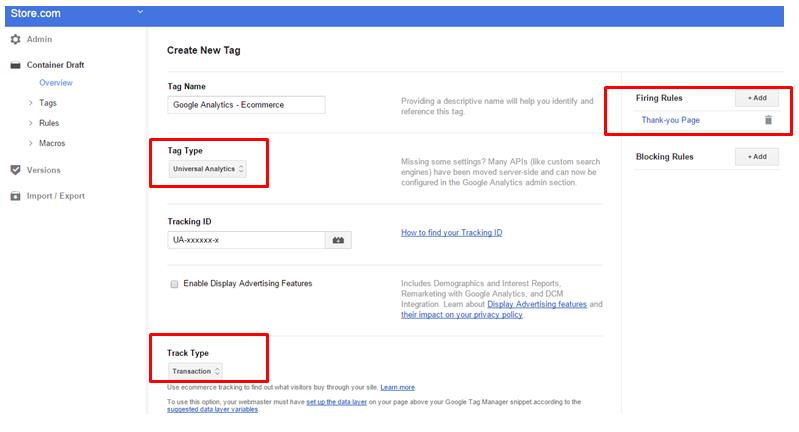
Create a transaction tag in Google Tag Manager container.
Step 5: Popular Filters
There are several filters you will want to consider, depending on the function of each of your views.
Show full URLs of domains and subdomains. If you have multiple subdomains, it is often helpful to see how visitors move between them. A common example is if you have a blog on a different subdomain. It could be interesting to see how many of your visitors are coming from blog pages, and which pages are sending the most buyers. With this filter, Google Analytics will record the full URL of each page.
Here’s how to set up this filter on your subdomains profile.
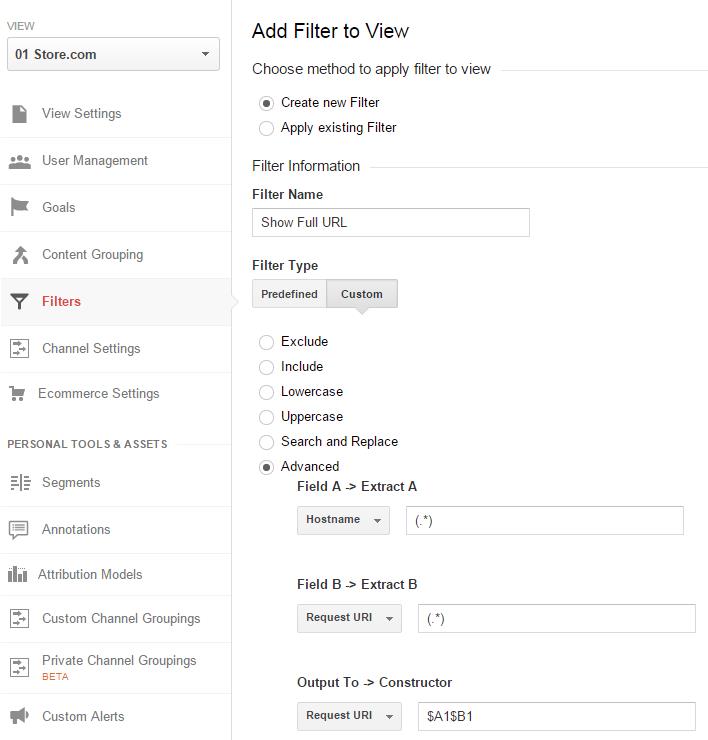
Create filters for your subdomains.
Exclude internal traffic. Locate the IP addresses of your office(s), and create exclusions to ensure that internal traffic does not inflate the numbers from your site visitors. The following predefined filter should be used to exclude single IP addresses.
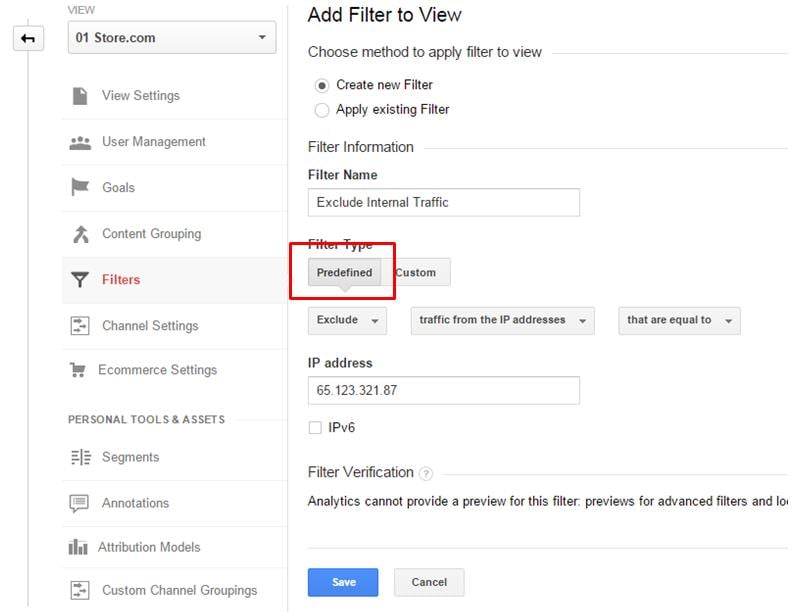
Create filters to exclude internal traffic.
To exclude a range of IP addresses, create a custom filter that allows the use of regular expressions for a range of IP addresses.
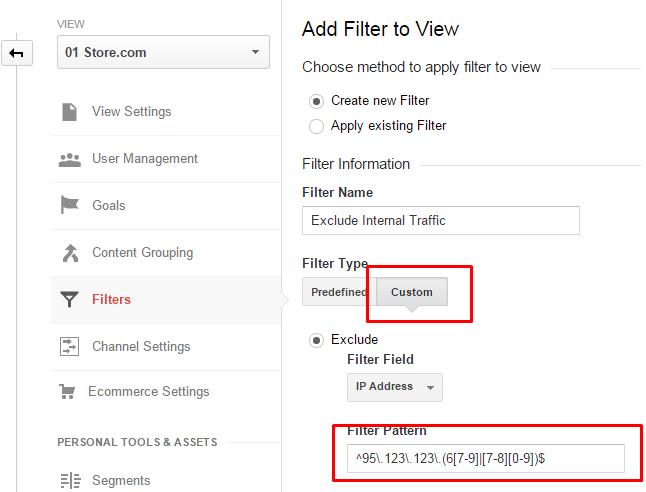
Create a filter to exclude a range of IP addresses by using regular expressions.
Step 6: Goal Setup
Goal setup is a quite common practice that sets out to identify activities considered to be conversions based upon users’ completion of specific actions on your site.
For an ecommerce site, making a purchase is considered to be a macro conversion. However, there could be other types of user activities that qualify as micro conversions such as email signups, sharing a product with a friend, and adding to cart.
Step 7: Conversion Funnel Setup
Even though transactions are tracked as ecommerce events (see Step 4), I highly recommended to set up a funnel of pages leading up to the purchase thank-you page.
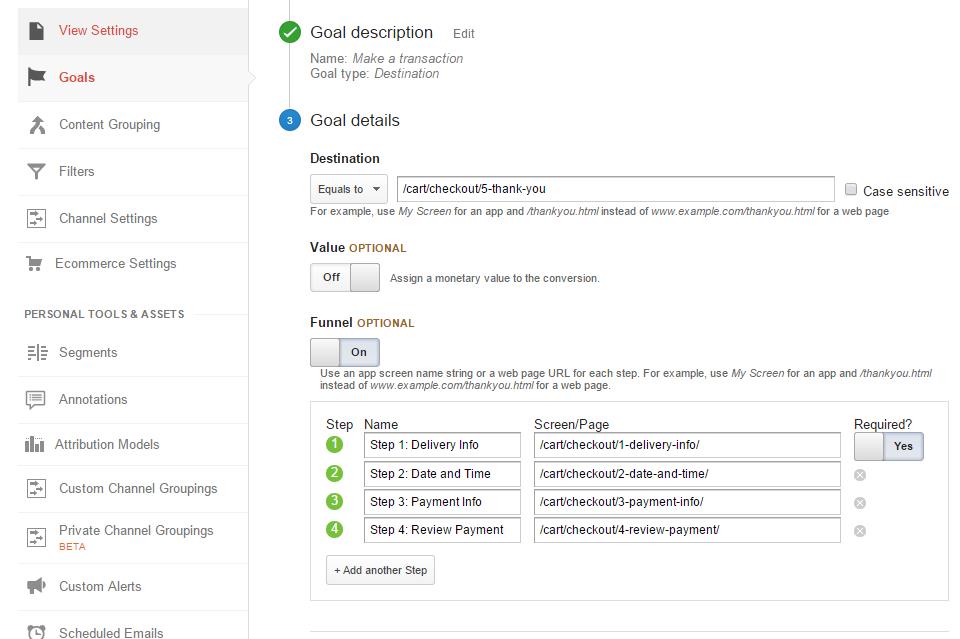
Set up a funnel of pages leading up to the purchase thank-you page.
Having goal completion set up this way enables the view of users’ flow through the conversion path and identifies weak points through the purchase funnel, as shown in this image.
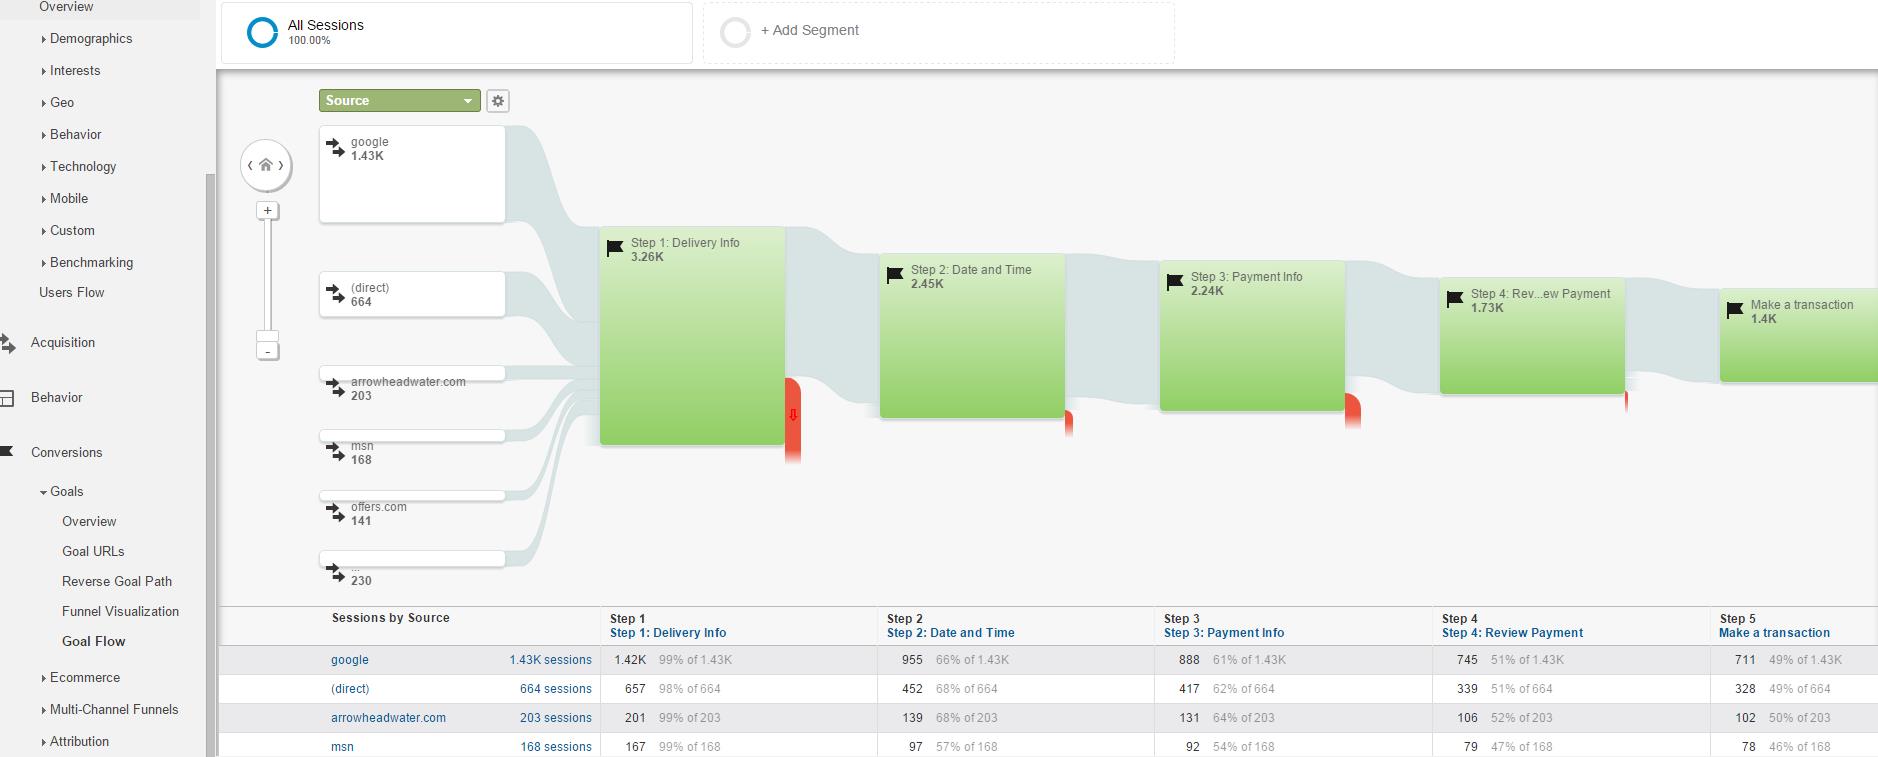
Setting up goal completion enables the view of users’ flow through the conversion path and identifies weak points.
Conclusion: Analytics Set Up Is Ready
The above steps allow tracking of the essential metrics for an ecommerce website. After tracking has been verified, you can move into the setup of more advanced tracking, like events, dashboards, custom dimensions and metrics, enhanced ecommerce, user ID, and so on.


