
Editor’s Note: We welcome Jason Lawrence as our newest contributor. He is a computer scientist, researcher, educator, and entrepreneur, having co-founded Arqspin, a mobile phone-based platform for creating 360 spins. He is also an associate professor in the Computer Science Department at the University of Virginia.
The way you present your products online has a significant impact on sales. Amateur-looking product shots erode consumers’ trust and could send them fleeing. Fortunately, you don’t need to spend $10,000 on equipment or hire a professional to create beautiful product photography that will instill faith in your online store and get results.
In this article, I’ll show you, in eight simple steps, how to save money on product photography and improve your store’s look and performance.
1. Camera
It’s important to use a nice camera. Fortunately, they have become very affordable. You can’t go wrong with a modern digital single-lens reflex (DSLR) model. I prefer the Nikon D7000 in terms of its price vs. performance tradeoff. Be sure to choose a camera that can capture video, and invest in decent lenses. I normally use a 50mm lens — here’s an example — which can accommodate mid-range and portrait work. A 105mm lens — here’s one from Adorama — while a bit expensive, is great for close-up work and jewelry product photography.
Although it used to be that having a DSLR was necessary for taking quality product photographs, smartphones have dramatically changed the game. The iPhone 5 has an 8-megapixel sensor and can produce professional grade shots. It’s received glowing reviews, like this one from The Sydney Morning Herald. I strongly encourage you to explore using your smartphone after you have the proper setup before committing to purchasing a higher-end camera. You may be surprised.
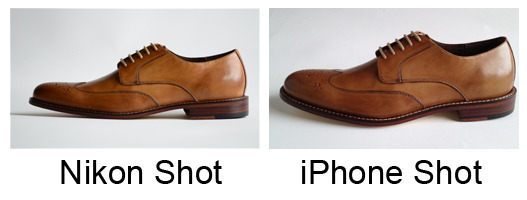
You may be surprised at the quality similarities between an iPhone and DSLR photo.
2. Lights
You will need some good lights. Of course, Mother Nature has a built-in option, which can produce great results. But the Sun is fickle. I like the Elinchrom D-Lite 4 Kit, which includes two lights, tripods, and attachable diffuser squares. While there are many photography lighting kits available, what’s most important for your setup is to get lights that operate in “continuous” mode — versus flash only — as this allows using them for video as well. In fact, I prefer to shoot even still photographs with my lights in continuous mode as I find this makes previewing the shot easier and adds depth to the result.
3. Tripod
You need to take longer exposures; holding your camera by hand will produce blurry images that shoppers will not like. I prefer Manfrotto tripod products. There are also some very functional tripods for smartphones such as the Woxom Slingshot.
4. Photo Setup
I like to shoot products in front of a continuous background — often white or neutral grey. It’s a simple and professional look that is often used by major online retailers. Fortunately, it’s simple to achieve.
Just purchase a few rolls of craft paper and some metal clamps. Roll the craft paper down a long and wide table and use the clamps to attach one end of the paper to something a few feet above the table. This will produce a smooth ramp. Place your product on the craft paper just after it comes into contact with the table.
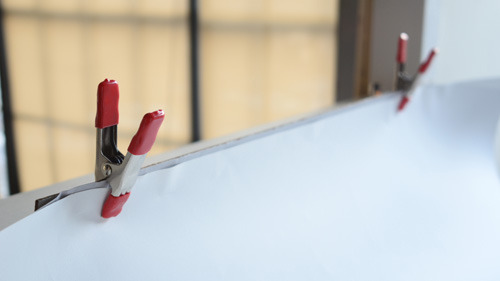
Craft paper and clips can make a nice do-it-yourself product shoot setup.
Place your setup near a big, sunny window if you want natural light, or in a dark room if you want to use your photo lights. For about $50 you have a professional studio like my setup below. If you’re looking for a ready-made setup, Modahaus carries a good line of all-in-one tabletop photography studios.
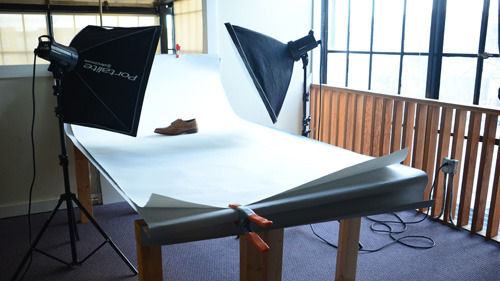
The author’s custom photography setup.
5. Use a Wide Aperture
The aperture is the opening that lets light into your camera and is specified by an “f-number” like “f/16” or “f/4”. A wide aperture (small f-number) produces a narrow depth of field that makes your photos look richer and more professional. I’ve found that shooting with a narrow depth of field works particularly well for product photos of electronics. Set the aperture on your DSLR to something like “f/1.8” or “f/2”. You will need to have your camera in “aperture priority” mode to do this. Check your manual.
These images below are from my iPad app, “Bokeh: A Book About Cameras.” The images illustrate the effect of a camera’s aperture on the final shot. The image on the left was captured with a wide aperture and has a narrow depth of field. The image on the right was from a narrow aperture and has a wide depth of field. In short, use a wide aperture to produce product photos with a more professional look.

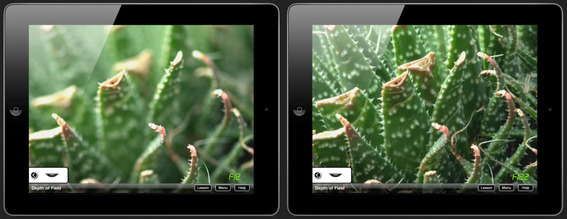
Wide aperture settings produce a narrow depth of field, such as the image on the left. Narrow apertures produce a wider depth, as in the image on the right.
6. Pay Attention to Shadows
Avoid harsh backlighting and other setups that cast shadows on the surface of the object. Keep the lights on the same side of the object as your camera, or slightly off to one side.
7. Clean Up
A big fingerprint on your product or dust on your lens produce poor, amateur results. Buy some microfiber rags and wipe everything down carefully before shooting.
8. Don’t be Afraid
The biggest obstacle to doing something new is often ourselves. Don’t be afraid to experiment. Be creative. You will make a few mistakes on your way to gaining a deeper understanding of the process. Not only will your sales increase, you will likely develop a new hobby along the way. When you’re ready to delve deeper there are many wonderful books. I like The Art of Photography, by Bruce Barnbaum.
Summary
You are well on your way to having an outstanding photography studio. Your product photos will appear as if you spent thousands on them. But really you did it all yourself.


