
Ecommerce merchants wear many hats. One of them is designing graphics for their websites. In my experience as a freelance graphic artist, I’ve adopted steps to help me become efficient and productive for each graphic project. I’ve listed those steps, below, hoping they can help non-professional graphic artists with their design tasks.
1. Understand Your Project
The first step in any design project is to understand your end goal. Before doing any serious design work, determine the scope of your project. This step will vary depending on what type of project you are working on. If you are doing some simple photo editing, this step will be less important than if you are designing a set of web graphics or a banner advertisement.
Depending on the project, you might want to do a few quick sketches on paper before moving into your image editor. Rough, hand-drawn sketches will help you quickly visualize your end goal. Sketches are also a great way to get a feel for balance and white space in your design without investing too much time in a design that will need serious revision later.
2. Customize Your Design Workspace
Many design applications allow you to customize your workspace, and even save workspace layouts depending on your project. Having your design workspace customized to the type of project you are working on can greatly decrease the amount of time you spend digging through sub-menus for commands and functions. Spending the time to set up your digital workspace before starting your project can save you lots of time in the long run.
Many design applications allow for customized workspaces, such as this one from Photoshop. Enlarge This Image
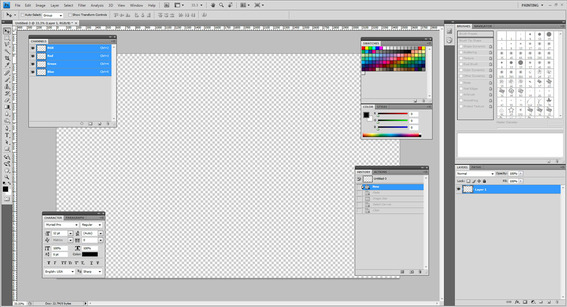
Physical workspaces can also be customized to optimize productivity. For some, this might mean clearing your desk of unnecessary clutter. For others, this could mean putting on music and having extra scrap paper nearby. One of the most helpful things I’ve done to improve design productivity is set up a secondary monitor with my computer. Whatever it means for you, take the time to set up your physical workspace as well your digital workspace when working on a project.
3. Save Multiple Revisions
Many designers fail to save multiple revisions of their design while they work. Saving your work under different file names as you progress is a great way to improve productivity. First and foremost, saving multiple revisions of your project helps protect against system failures that could cause you to lose your work. Few things are more frustrating than losing several hours worth of productivity due to a power outage or computer crash.
Furthermore, because design is often an evolutionary process, having multiple revisions of your design allows you to compare your work at different stages of the design process. This can also be useful if you decide to experiment with a design and end up disliking the direction you went. Being able to load an earlier version of the design can save you from cycling through multiple undo states, or worse, from running out of undo states to revert to.
4. Tips for Saving Multiple Revisions
When saving multiple revisions, try to save after significant changes have been made to your design. Don’t save every time you make a small, insignificant change, as you will soon be bogged down in an unnecessary amount of revision files.
Use a consistent, incremental naming convention with all of your design project revisions. For example, the project name followed by “v1,” v2,” and “v3” would be an acceptable naming convention.
Savings design revisions under different names allows you to revisit a prior design or direction.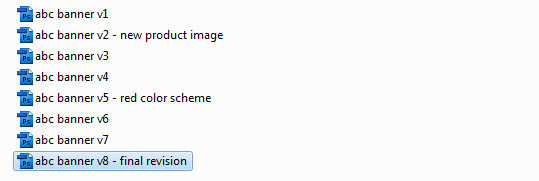
You may also want to consider adding a short description of the changes particular to each revision file. For example, “project name v1 – blue color scheme” would be a good way to indicate that a particular revision file used blue color scheme. Note that adding the description after the version number will still allow you to sort your file revisions alpha-numerically.
5. Build a Resource Library
The more time you spend designing, the more you’ll discover you reuse certain design elements or templates in your work. A great timesaving technique is to begin to save templates or design elements you have used more than once to a designated location. Creating a resource folder for templates, design elements, custom fonts, and color palettes is an effective way to save time later.
Keep your resource folder organized. The goal of saving files you frequently use is to save you from having to scour the Internet for them later. If your resource files are disorganized, you might as well be searching the Internet.
6. Create an Inspiration Pool
Similar to building a resource library, creating a place to save inspirational design pieces is a good practice for any designer to have. Whenever you see a design you really like, or that you would like to mimic later, save it to a folder. The next time you are having a hard time coming up with ideas for a project, browse your inspiration collection and see if anything sparks an idea.
7. Learn Shortcut Keys
I cannot stress enough how important shortcut keys are when it come to fast, efficient design. Learning shortcut keys is the number one time saving thing you can do when it comes to design. While it may not seem like shortcut keys would save you more than a second or two, those seconds begin to add up. Most design programs are riddled with a myriad of menus and sub-menus containing important functions, most of which have an assigned shortcut key.
A good way to learn shortcut keys is to see which functions you use the most often. If you find yourself using a specific button or function with the mouse more than five times in a few minutes, learn that shortcut key. You might also find it useful to start compiling a “cheat sheet” with the shortcut keys you are learning until you have them committed to memory.
Be aware that not every function in a design application is going to have a preassigned shortcut key. Luckily, most applications allow you to customize and save keyboard shortcuts, so you can assign your own shortcut keys to functions that don’t already have default keys assigned.
The bottom line is using shortcut keys will always be faster than using the mouse.
8. Overcoming Design Block
Oftentimes designers will hit a wall when designing and not know “where to go next.” Whenever I have a creative block, I like to do a couple of things. First, I’ll try taking a break. Sometimes just being away from a project for a while clears my head and allows me to come back to the project with “fresh eyes.” Another trick I use is to work on another project for a while. Focusing my attention on a new problem frequently helps me “subconsciously” work through a creative block. Finally, I occasionally like to start over completely on a design that is giving me trouble (after saving a revision of course). I find that when I have designed myself into a corner, starting over helps free me from constraints I may have developed for myself during the original design and allows me to begin working from blank, uninhibited space.


