Google Analytics is loaded with reports and has many settings that can be customized to enhance reporting. The following checklist is designed for ecommerce merchants. By using Google Analytics’ reporting capabilities, merchants can obtain the data to grow their business.
Google Analytics Setup Checklist
1. Use the latest code. Make sure your Google Analytics’ tracking code is updated by going to Admin > Property > Tracking Info > Tracking Code to view the latest version.
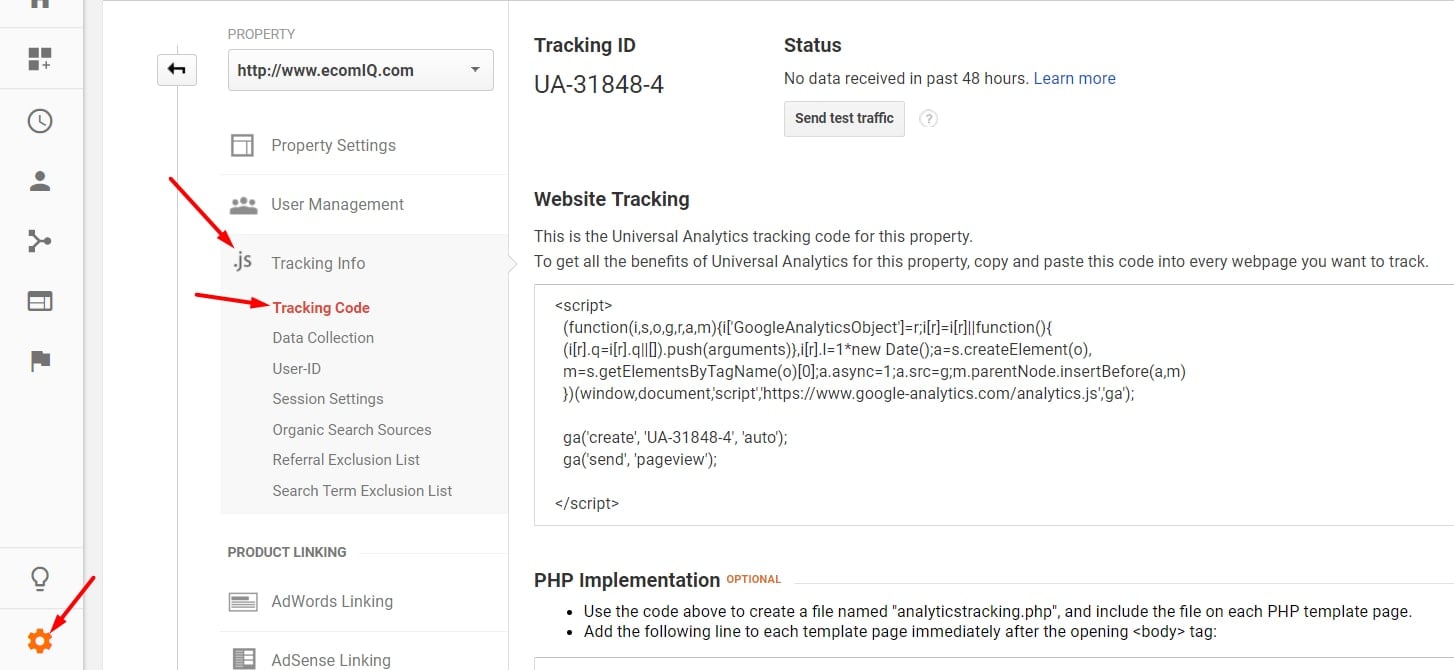
Check that your Google Analytics’ tracking code is updated by going to Admin > Property > Tracking Info > Tracking Code.
2. Confirm time zone in Analytics matches AdWords. Ensure your Analytics and AdWords traffic align by time of day by clicking on the Admin > View > View Settings. The time zone setting is down the page.
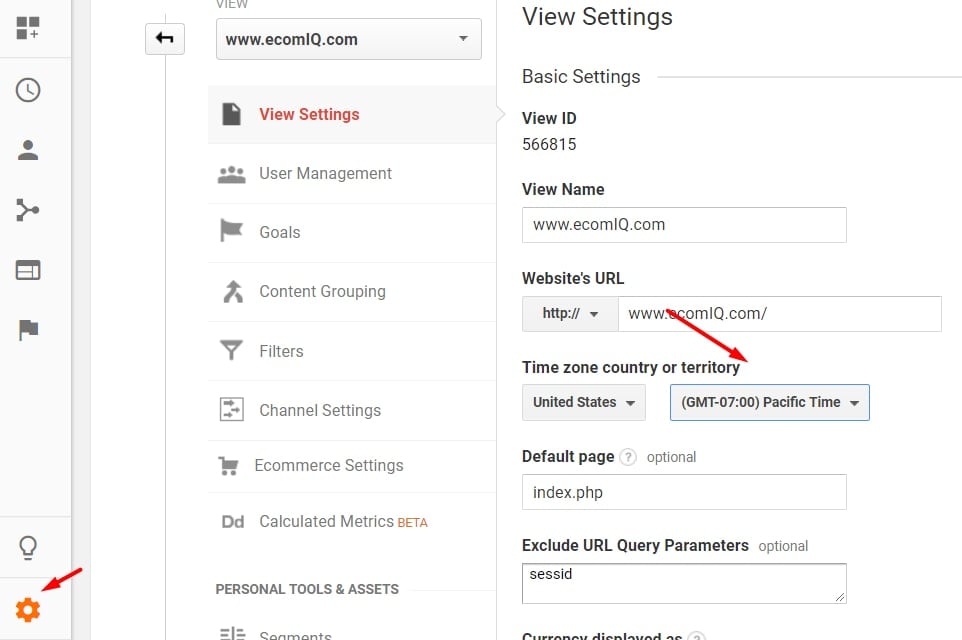
Ensure your Analytics and AdWords traffic align by time of day by clicking on the Admin > View > View Settings.
3. Check “View Settings.” Give your Google Analytics View a descriptive name. It defaults to “All Website Data,” which is not very helpful. Set the default page to be your home page URL.
If you want certain query parameters to not appear in your content reports (so that pages are grouped together that contain those query parameters with different values), enter those parameters in the “Exclude URL Query Parameters” section.
Make sure your currency is correct.
Click the box to “Exclude all hits from know bots and spiders” to minimize this traffic from muddying up your reporting. I addressed spam traffic at “Google Analytics: Removing Internal Traffic and Referral Spam.”
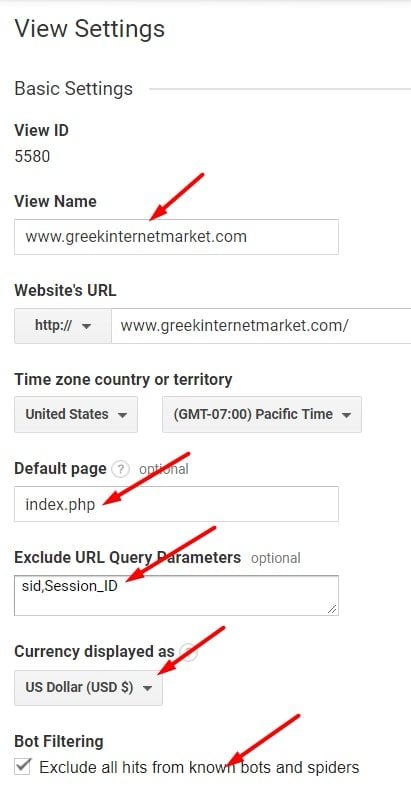
Give your View a descriptive name, such as your home page URL.
4. Ensure AdWords is linked to Analytics. Ensure AdWords is linked to Analytics by going to Admin > Property > AdWords Linking. If you do not see your AdWords account linked in this area, click “New Link Group” and follow the instructions.
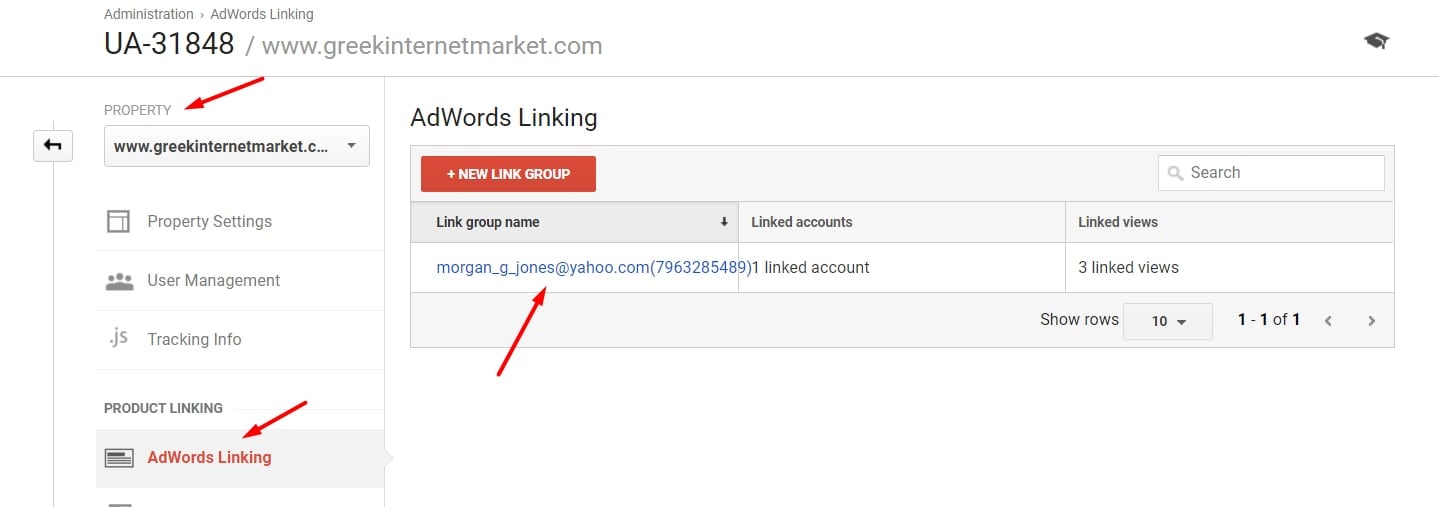
Ensure AdWords is linked to Analytics by going to Admin > Property > AdWords Linking.
You can also verify that AdWords is linked by going to Acquisition > AdWords > Campaigns to view click data. If you do not see “Clicks,” but just “Sessions,” then something is not set up correctly.
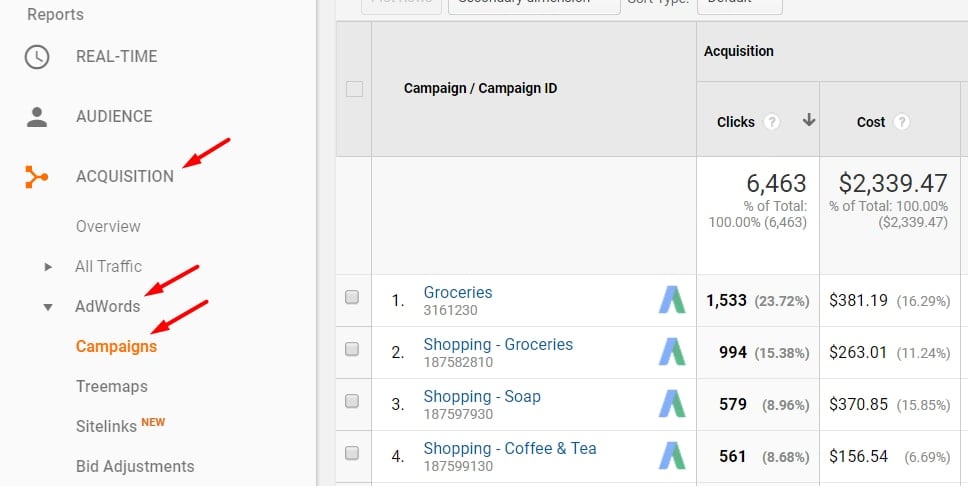
Verify AdWords is linked by going to Acquisition > AdWords > Campaigns to view click data.
5. Import other paid traffic sources. Ensure that you can compare AdWords to Bing, Facebook, and other cost-per-click traffic by setting up cost imports for those channels. I explained how to do this at “Using Google Analytics to Optimize Bing Ads, Other Channels.”
6. Integrate Search Console. Confirm that Search Console is linked by going to Admin > Property > All Products. On that page, look for “Search Console” and confirm it says “Receiving Data.”
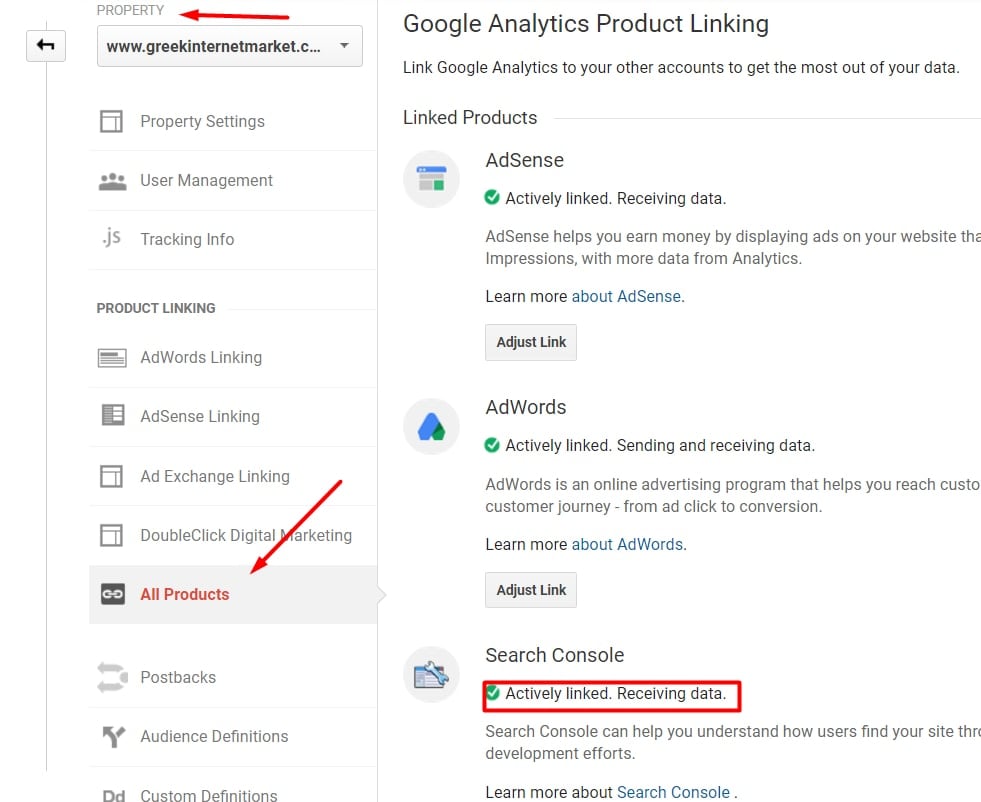
Ensure Search Console is linked by going to Admin > Property > All Products.
Another way to verify that Search Console is linked to Analytics is to go to Acquisition > Search Console > Landing Pages to view organic data. If you do not see data here, follow the instructions to link Search Console.

Acquisition > Search Console > Landing Pages will also verify if Search Console is linked to Analytics.
7. Enable demographics and interests reporting. Ensure you can view demographic and interests data by going to Audience > Demographics > Overview. If you do not see data, follow the instructions on the page to provide this very rich layer to your reporting.
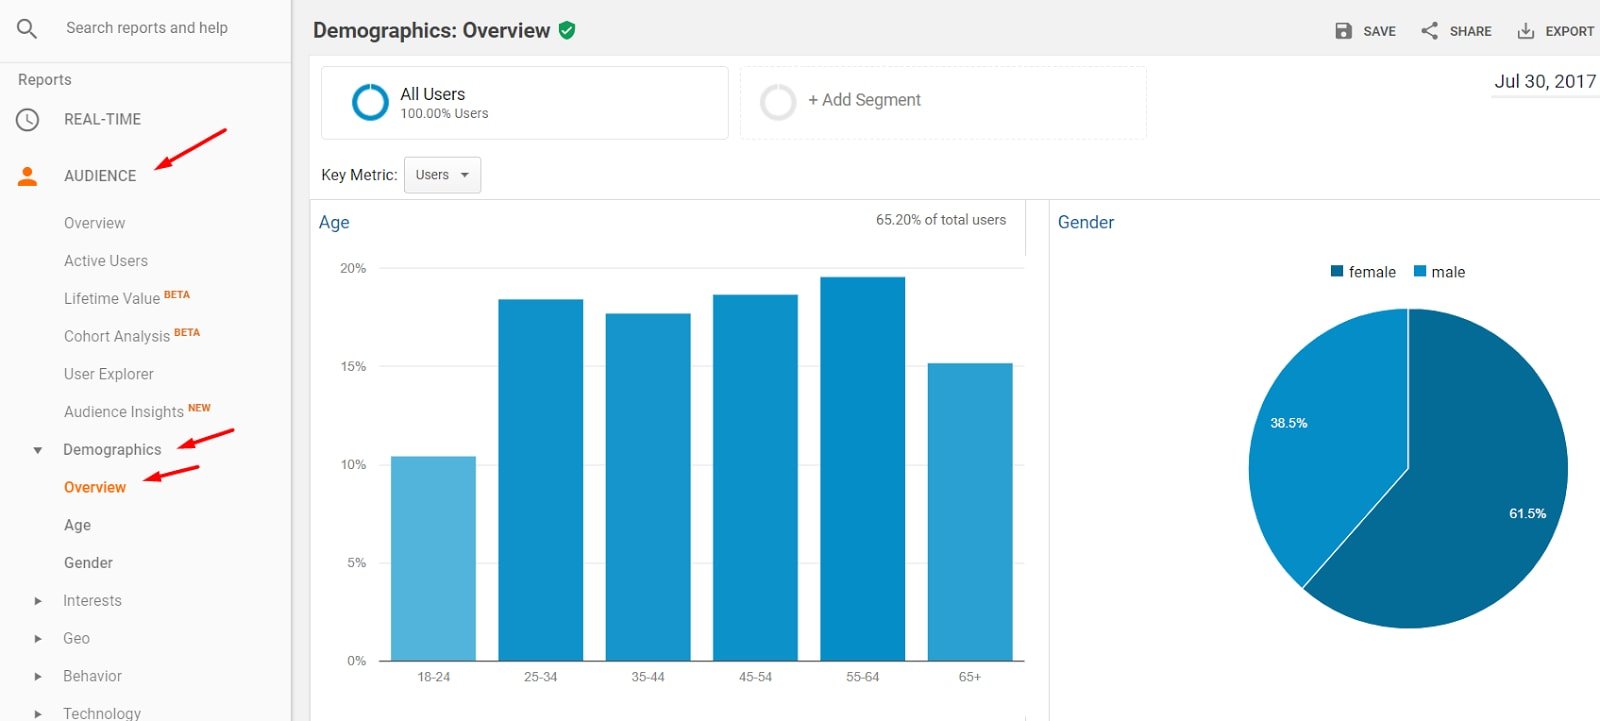
Ensure you can view demographic and interests data by going to Audience > Demographics > Overview.
8. Eliminate internal traffic. Ensure you are not overwriting sources of traffic with self-referrals. For more, see “Google Analytics: Removing Internal Traffic and Referral Spam.”
9. Enable site search tracking. Enable site search tracking by going to the Admin > View > View Settings. Towards the bottom of the page, site search tracking can be enabled and configured.
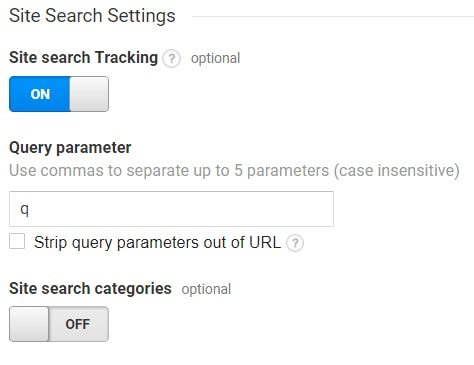
Enable site search tracking by going to the Admin > View > View Settings.
10. Create goals. Report essential engagement on your ecommerce site, such as purchases and newsletter signups, by creating goals. Include goal funnels to identify key points where shoppers abandon. Go to Conversions > Goals > Overview to enable goals and to see which are working or have broken.

Go to Conversions > Goals > Overview to enable goals and to see which are working or have broken.
I’ve addressed goal setting previously, at “Google Analytics: Using Goals, Funnels to Improve Conversions.”
11. Enable ecommerce, including Enhanced Ecommerce. Report purchases, products purchased, and sources of sales with the ecommerce reporting suite. Ensure “Ecommerce” is reporting by going to the Conversions > Ecommerce > Overview report.

Ensure “Ecommerce” is reporting by going to the Conversions > Ecommerce > Overview report.
12. Create custom alerts. Minimize the loss of critical data by creating custom alerts to tell you, for example, when your site stops reporting or session reporting breaks. To learn more on creating custom alerts, see “10 Google Analytics Custom Alerts for Ecommerce.”