While setting up conversion tracking is a must, setting up values for those conversions is equally important. Even if you don’t have an ecommerce site or sell products at a set amount, you can still assign values to your conversions.
While it’s been possible to assign values to conversions on Google AdWords and Bing Ads for some time, conversion tracking and assigning values is still relatively new for the major social platforms — even LinkedIn still doesn’t offer conversion tracking.
While it’s been possible to assign values to conversions on Google AdWords and Bing Ads for some time, conversion tracking and assigning values is still relatively new for the major social platforms…
Why you would want track conversions on the social networks directly? Because it is simply another way to double-check the data. While you should have conversion tracking set up in Google Analytics, adding it to the social ad networks gives you another check to determine if the values Google is reporting match Facebook, and vise-versa.
Setting up conversion values is generally straightforward. Just change the conversion value amount on each tracking pixel to the actual value of the conversion you want to track.
If you have a set price for each conversion, this makes it easy. However, if you have a variable value for each conversion, it is more complex. You’ll likely need a developer to complete it. I’ll still walk through the general, high-level process, but not the actual implementation.
In this article, I’ll review two business scenarios, covering Facebook and Twitter ads, on how to add conversion values.
- Scenario 1. An ecommerce site with a single product at a fixed cost of $25, and it doesn’t offer discounts, ever.
- Scenario 2. An ecommerce site with a single type of product, at multiple price points, where multiple orders are permitted.
These two scenarios should cover most of the situations you’ll run into when it comes to setting up conversion values.
I’m going to assume that you already have checkout conversion pixels set up for both Facebook and Twitter in both scenarios.
Scenario 1: Single Product, Fixed Cost, No Discounts
For scenario 1, I’ll assume an ecommerce site with a single product, purchased one at a time, at a fixed cost of $25, with no discounts, ever. This is the easiest setup by far. Implementing conversion values will be easy.
Let’s start with Twitter. When you log in to the ads manager and view your conversion pixels, click “Edit” next to any pixel you want to change. From there you’ll be taken to the settings page for the pixel, and you’ll be presented with the code. We’ll need to change two values, in three places separately, for six changes in total. We’ll be changing two things.
- tw_order_quantity
- tw_sale_amount
I’ve highlighted where these appear in the screenshot below.
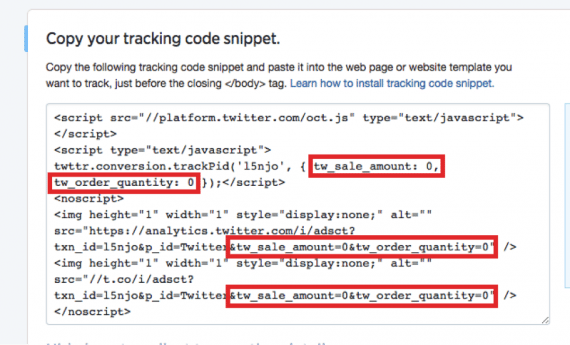
Changing tracking-pixel quantities and amounts in Twitter.
Change every ”0” after “tw_order_quantity” to “1” and change every “0” after “tw_sale_amount” to “25.00.” And that’s it. We’re done setting up conversion information for Twitter.
Now for Facebook. It’s much of the same setup. Log in to the ads manager, and click “Conversion Tracking” on the right side. Once you are on the conversion view page, hover over the pixel you want to change and click on the “gear” icon — a hover-over of “View Code” should appear. Once you click the gear, you’ll see a popup of your code, and — even easier than Twitter — I’ll change just one thing.

Changing values for tracking pixels in Facebook is straightforward.
You’ll see a line of code (highlighted in red, above) that has “{‘value’:’0.00′,’currency’:’USD’};”. Just change the “0.00” to “25.00” and that’s it.
That’s all you have to do in this scenario 1. From here on out you’ll start to see values in your Twitter and Facebook ads manager when someone converts.
Scenario 2: Single Product Type, Multiple Price Points
For scenario 2, I’ll assume an ecommerce site with a single type of product, at multiple price points, where multiple orders are permitted.
This scenario is more complex. It’s not as complex as an ecommerce site with multiple product types at multiple price points, but it is still a challenge.
I’ve already explained how to change the conversion value. But now we need to update both the conversion value and the conversion quantity. For example, if someone purchased two products at checkout, we want to make sure we capture all of the transaction details, versus just a single sale worth a set amount.
Implementing both the conversion value and quantity is tricky, as ecommerce sites are set up differently. But here’s what you should change, with some tips on how to make sure it changes.
First, review how you track the value and quantity with your developer. Explain to her that you have the two variables, price and quantity, and that they need to be dynamically updated with the checkout information on a sale. This way, your ecommerce system will pass the actual sales information through to the pixels, which will pass this through to the platforms.
If you use Google Tag Manager — see my article, “Using Google Tag Manager to Track Social Conversions” — your developer can set up a user-defined variable with this information. You can then replace the appropriate values with what your developer has set up, and then manage the pixels through Google Tag Manager, which I recommend.